Одна из довольно частых жалоб о том, как раздражает нас, когда рекламные ролики значительно громче, чем громкость программы в которой показывается реклама.
Т.к. недовольных становится всё больше мы решили создать небольшой гаджет, который позволит решить проблему. Устройство автоматически уменьшает громкость телевизора, когда звук становится слишком громким. Оно может быть запрограммирован для работы на любом устройстве, которое использует ИК-пульт дистанционного управления.

Шаг 1: Компоненты и инструменты
Инструменты и материалы:
- паяльник
- припой
- макетная плата
- провода-перемычки

Компоненты:
- 1x 16x2 ЖК-экран
- 1x Arduino Nano (или аналог)
- 3x 12-ти миллиметровые кнопки
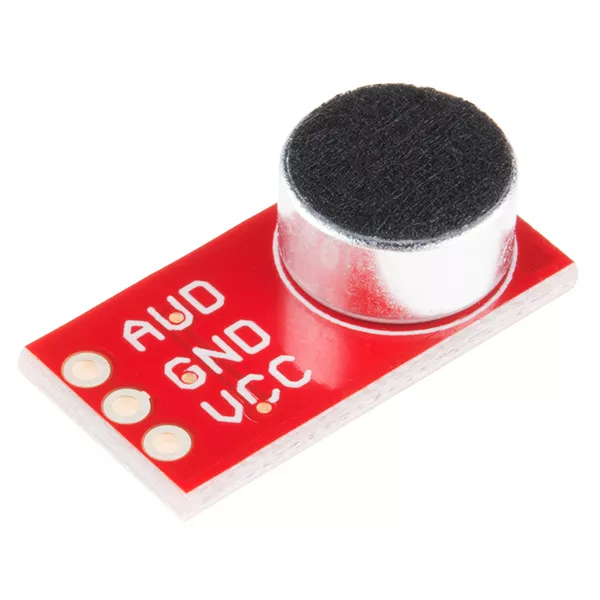
- 1x Электретный микрофон. Например, Adafruit или Sparkfun:

- 1x Потенциометр
- 1x PN2222 транзистор
- 1x TSOP38238 ИК-ресивер (приемник)
- 1x ИК-светодиод
- 1x резистор 100 Ом
- 1x 220 Ом резистор
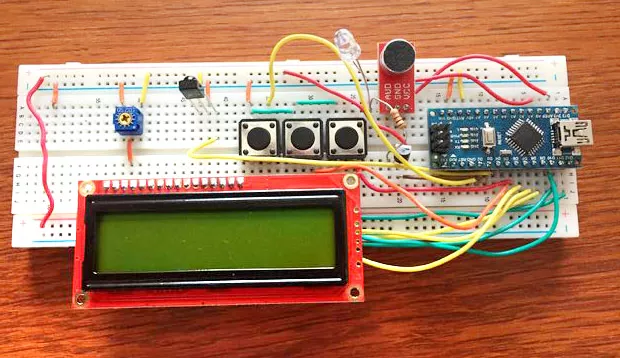
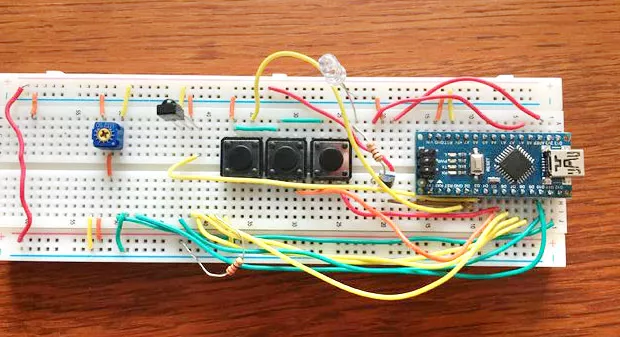
Шаг 2: Собираем схему
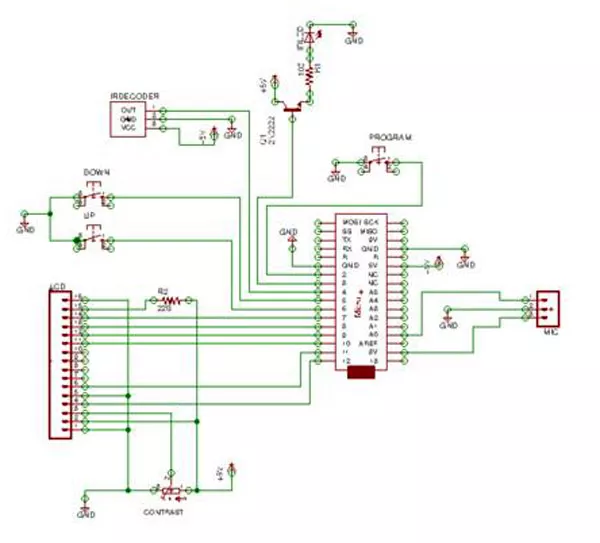
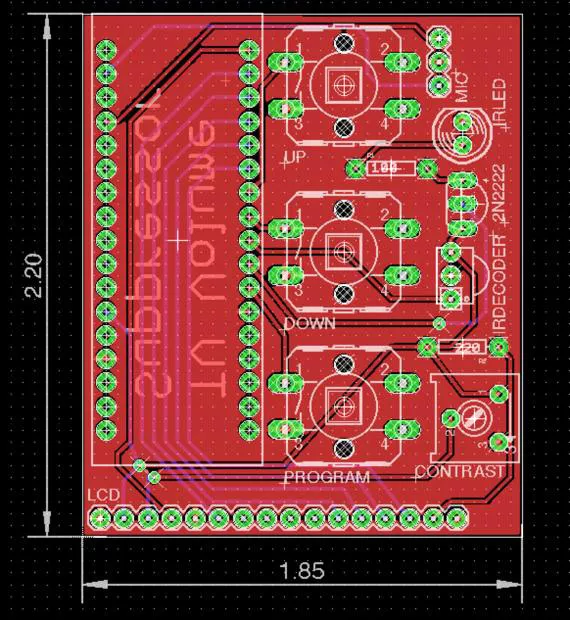
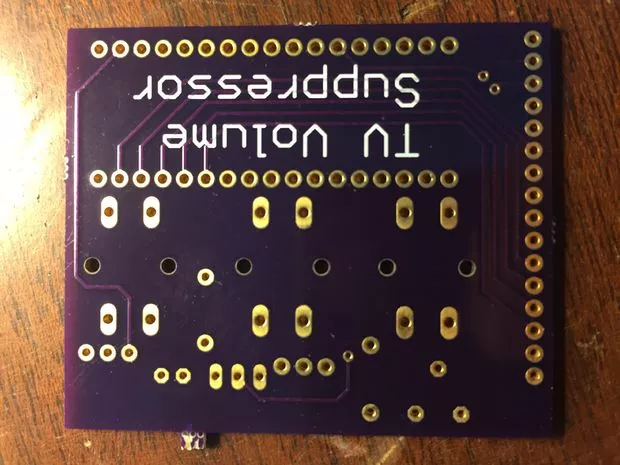
Т.к. мы всегда хотим, чтобы всё выглядело красиво, мы решили изготовить печатную плату профессионально. Использовали Eagle для создания схемы и платы. Ниже приводим краткий обзор распиновки:
- A0 поступает на выход микрофона
- Контакт 2 переходит к кнопке «Программа»
- Контакт 3 идет к затвору транзистора
- Контакт 4 поступает на выход ИК-приемника
- Контакт 5 к кнопке «Вниз»
- Контакт 6 к кнопке «Вверх»
- Контакты 7, 8, 9, 10, 11 и 12 идут к на ЖК-дисплей
- 3,3 вольта к микрофону
- 5 вольт на транзистор / ИК-светодиод, потенциометр и ЖК-дисплей
Файлы проекта (схематическое изображение электронной схемы и т.п.) в нескольких стандартных форматах можно скачать ниже. Например, файлы BRD можно просматривать в программе Cadence Allegro Free Physical Viewer, предоставленной бесплатно на веб-сайте Cadence.
Шаг 3: Код для Arduino
Действие устройства мы опишем на следующем шаге. Код для загрузки в нашу Arduino и архив с дополнительными файлами вы найдете ниже.
//Included Libraries
#include <IRremote.h>
#include <LiquidCrystal.h>
#include <EEPROM.h>
// Pin Declarations and Class Initializations
#define micPin A0
#define programButton 2
#define irLed 3
#define irReceiver 4
#define downButton 5
#define upButton 6
IRrecv irrecv(irReceiver);
IRsend irsend;
decode_results results;
LiquidCrystal lcd(12, 11, 10, 9, 8, 7);
//Program Variables
const float increment = 0.1; //amount to change limitdB
float limitdB; //dB threshold
int currentTime = 0;
int lastEventTime = 0;
int repeatVal = 3; //How many -Vol button presses to make when triggered; 3 is default
int maxMicReading = 720; //Used for gain calculations, you'll have to measure/adjust for your system.
///////// The following five are for storing the recorded IR code
int codeType = -1; // The type of code
unsigned long codeValue = 1; // The code value if not raw
unsigned int rawCodes[RAWBUF]; // The durations if raw
int codeLen; // The length of the code
int toggle = 0; // The RC5/6 toggle state
int count; // for raw code
///////// The following is for eeprom memory allocation
int eepromAddress = 0;
int repeatValAddress = sizeof(results); //repeatVal is stored after IR data in eeprom
int limitdBAddress = sizeof(results) + sizeof(repeatVal);
//Program Functions
void checkButtons();
void checkVolume();
void setBurst();
void programIR();
void storeCode(decode_results *results);
void sendCode(float currentdB, decode_results *results);
float systemVoltage();
void setup()
{
lcd.begin(16,2);
int outputPins[] = {irLed, 7, 8, 9, 10, 11, 12};
int inputButtons[] = {programButton,upButton, downButton};
int inputSensors[] = {micPin, irReceiver};
EEPROM.get(eepromAddress, results); //get previously saved IRcode data
EEPROM.get(repeatValAddress,repeatVal); //get previously saved repeatVal
EEPROM.get(limitdBAddress, limitdB); //get previously saved decibel limit
if(limitdB != limitdB) //If uninitilized in eeprom, this will set limitdB to a default value of 3.
{ //Otherwise, limitdB would be NaN
limitdB = 3.0;
}
for(int i = 0; i < (sizeof(outputPins)/sizeof(*outputPins)); i++)
{
pinMode(outputPins[i], OUTPUT);
}
for(int i = 0; i < (sizeof(inputButtons)/sizeof(*inputButtons)); i++)
{
pinMode(inputButtons[i], INPUT_PULLUP);
}
for(int i = 0; i < (sizeof(inputSensors)/sizeof(*inputSensors)); i++)
{
pinMode(inputSensors[i], INPUT);
}
//For easy testing during installation.
lcd.clear();
lcd.setCursor(0,0);
lcd.print("Ready, Sending");
lcd.setCursor(0,1);
lcd.print("Out Test...");
delay(2000);
sendCode(0.0, &results);
lcd.clear();
lcd.setCursor(0,0);
lcd.print("Done");
//
lastEventTime = millis(); //Initialize Timer
}
void loop()
{
currentTime = millis();
if(currentTime - lastEventTime >= 5000)
{
lcd.clear(); //clear screen if enough time has passed
}
checkButtons();
checkVolume();
}
/*
* Pretty simple, just checks the state of the buttons.
*/
void checkButtons()
{
if(digitalRead(upButton) == LOW || digitalRead(downButton) == LOW) //For setting decibel limit
{
//Maximum possible decible reading is 6
if(digitalRead(upButton) == LOW && limitdB < 6.0)
{
limitdB += increment;
EEPROM.put(limitdBAddress, limitdB);
}
//The gain should be 0 dB in a silent environment, so that is our floor value.
if(digitalRead(downButton) == LOW && limitdB > 0)
{
limitdB -= increment;
EEPROM.put(limitdBAddress, limitdB);
}
lcd.clear();
lcd.setCursor(0,0);
lcd.print("Current Limit:");
lcd.setCursor(0,1);
lcd.print(limitdB);
lcd.print(" dB");
lastEventTime = millis();
}
if(digitalRead(programButton) == LOW) //For setting volume IR commands or burst length
{
lcd.clear();
lcd.setCursor(0,0);
lcd.print("Prgm new or set");
lcd.setCursor(0,1);
lcd.print("burst? (UP/DN)");
while(digitalRead(upButton) == HIGH && digitalRead(downButton) == HIGH) //wait for user input
{
delay(10);
lastEventTime = millis();
}
if(digitalRead(upButton) == LOW)
{
programIR();
}
if(digitalRead(downButton) == LOW)
{
setBurst();
}
lastEventTime = millis();
}
delay(150);
return;
}
/*
* Calculates current volume in decibels. To do so, it uses a sneaky
* method of accuratly measuring the rail voltage of the controller
* and then uses that to rescale the ADC conversion to more accurately
* represent the voltage measurements. If the current volume is
* above the set limitdB, the controller sends the -Volume command
* to the tv.
*
* I couldn't figure out why, but the microphone will sometimes
* output more voltage than what I measured the 3.3v
* pin to be outputting, which would give an occasional decibel
* reading of 7, even though the maximum theoretical value is 6.02.
* To get around this measure what the maximum micReading is and
* adjust maxMicReading accordingly.
*/
void checkVolume()
{
float reading = analogRead(micPin);
float adjustedADC = (systemVoltage()/5.0)*1024;
adjustedADC = adjustedADC*(3.3/5);
float currentdB = 20*log10(reading/(maxMicReading/2));
if(currentdB >= limitdB)
{
decode_results temp;
EEPROM.get(eepromAddress, temp);
lcd.clear();
lcd.setCursor(0,0);
lcd.print("Vol is: ");
lcd.print(currentdB);
lcd.print(" dB");
lcd.setCursor(0,1);
lcd.print("-Vol ");
lcd.print(repeatVal);
lcd.print(" units");
sendCode(currentdB, &temp);
}
return;
}
/*Sets number of change Volume commands issued per instance.
*It will display the current amount as you press the up/down buttons.
*Once the program button is pressed, it saves this number to the eeprom
*and exits the function.
*/
void setBurst()
{
lcd.clear();
lcd.setCursor(0,0);
lcd.print("Burst Length: ");
lcd.print(repeatVal);
lcd.setCursor(0,1);
lcd.print("Prgm to continue");
delay(250); //debounce
while(digitalRead(programButton) == HIGH) //loop until programButton is pressed
{
delay(100);//debounce
if(digitalRead(upButton) == LOW)
{
repeatVal++;
lcd.clear();
lcd.setCursor(0,0);
lcd.print("Burst Length: ");
lcd.print(repeatVal);
lcd.setCursor(0,1);
lcd.print("Prgm to continue");
}
if(digitalRead(downButton) == LOW)
{
if(repeatVal > 0)
{
repeatVal--;
}
lcd.clear();
lcd.setCursor(0,0);
lcd.print("Burst Length: ");
lcd.print(repeatVal);
lcd.setCursor(0,1);
lcd.print("Prgm to continue");
}
}
lcd.clear();
lcd.setCursor(0,0);
lcd.print("Burst set to: ");
lcd.print(repeatVal);
EEPROM.put(repeatValAddress, repeatVal);
}
/*
* Displays screen queues for programming the -Volume command into
* the arduino
*/
void programIR()
{
lcd.clear();
lcd.setCursor(0,0);
lcd.print("Press -Volume");
lcd.setCursor(0,1);
lcd.print("Button Now");
irrecv.enableIRIn();
while(!irrecv.decode(&results))
{
if (irrecv.decode(&results))
{
storeCode(&results);
lcd.clear();
lcd.setCursor(0,0);
lcd.print("Code Recorded:");
lcd.setCursor(0,1);
//Sanity check, shows the button code recorded
decode_results temp;
EEPROM.get(eepromAddress, temp);
lcd.print(temp.value, HEX);
delay(2000);
}
}
lastEventTime = millis();
return;
}
//Borrowed code. Stores all necessary information for using IR commands in the eeprom
void storeCode(decode_results *results)
{
codeType = results->decode_type;
count = results->rawlen;
codeValue = results->value;
codeLen = results->bits;
if (codeType == UNKNOWN)
{
codeLen = results->rawlen - 1;
// To store raw codes:
// Drop first value (gap)
// Convert from ticks to microseconds
// Tweak marks shorter, and spaces longer to cancel out IR receiver distortion
for (int i = 1; i <= codeLen; i++)
{
if (i % 2) {
// Mark
rawCodes[i - 1] = results->rawbuf[i]*USECPERTICK - MARK_EXCESS;
}
else
{
// Space
rawCodes[i - 1] = results->rawbuf[i]*USECPERTICK + MARK_EXCESS;
}
}
}
EEPROM.put(eepromAddress, *results); // save new data to EEPROM
}
//Borrowed code. Retrieves IR code stored in the eeprom sends it out through the IR LED.
void sendCode(float currentdB, decode_results *results)
{
codeValue = results->value;
codeType = results->decode_type;
count = results->rawlen;
codeLen = results->bits;
for(int i = 0; i < repeatVal; i++)
{
if (codeType == NEC)
{
irsend.sendNEC(codeValue, codeLen);
}
else if (codeType == SONY)
{
irsend.sendSony(codeValue, codeLen);
}
else if (codeType == RC5 || codeType == RC6)
{
// Put the toggle bit into the code to send
codeValue = codeValue & ~(1 << (codeLen - 1));
codeValue = codeValue | (toggle << (codeLen - 1));
if (codeType == RC5)
{
irsend.sendRC5(codeValue, codeLen);
}
else
{
irsend.sendRC6(codeValue, codeLen);
}
}
else if (codeType == SAMSUNG)
{
irsend.sendSAMSUNG(codeValue, codeLen);
}
else if (codeType == UNKNOWN /* i.e. raw */)
{
// Assume 38 KHz
irsend.sendRaw(rawCodes, codeLen, 38);
}
delay(150); //long delay, different protocols have different requirements before sending more commands or repeating
}
lastEventTime = millis();
}
//Code I borrowed for measuring the mircrocontroller's actual reference voltage.
//How it works is beyond me, but it works nonetheless.
float systemVoltage()
{
long result;
// Read 1.1V reference against AVcc
ADMUX = _BV(REFS0) | _BV(MUX3) | _BV(MUX2) | _BV(MUX1);
delay(2); // Wait for Vref to settle
ADCSRA |= _BV(ADSC); // Convert
while (bit_is_set(ADCSRA,ADSC));
result = ADCL;
result |= ADCH<<8;
result = 1125300L / result; // Back-calculate AVcc in mV
float Vcc = result/1000.0;
return Vcc;
}
Шаг 4: Как использовать устройство


Идеи для тяжелой части кода были фактически заимствованы из других проектов, которые мы нашли в Интернете. Мы использовали ИК-библиотеку для декодирования сигналов ТВ-пульта и для повторения сигнала на телевизоре. Также заимствовали другие фрагменты кода для точного измерения опорного напряжения АЦП Arduino, т.к. даже небольшие ошибки создали бы большую разницу в показаниях громкости микрофона. Если у вас есть идеи по улучшению кода - оставляйте комментарии в нашей группе ВКонтакте, т.к. наш код прошел череду проб и ошибок.
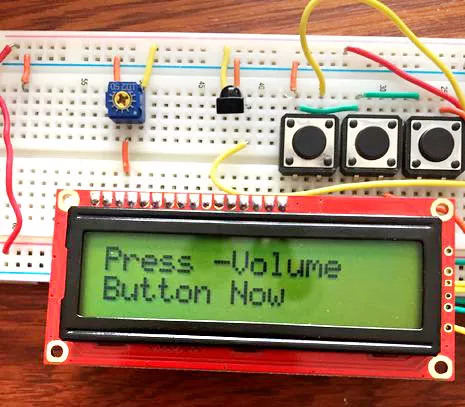
В принципе, Arduino постоянно проверяет состояние трех кнопок и громкости. Если нажата кнопка «Вверх» или «Вниз», уровень громкости, или максимальная громкость до того, как система будет запущена для уменьшения громкости телевизора, будет увеличен или уменьшен. Чтобы установить ИК-код, который отправляется при превышении порогового значения, нажмите кнопку «Программа» (Program), а затем кнопку «Вверх». Когда на экране появится запрос на нажатие кнопки -Volume (Уменьшения громкости), наведите пульт телевизора на ИК-приемник и нажмите кнопку -Volume ("Уменьшить"), пока на экране не появится шестнадцатеричное значение, соответствующее команде TV -Volume (добавлено для проверки).
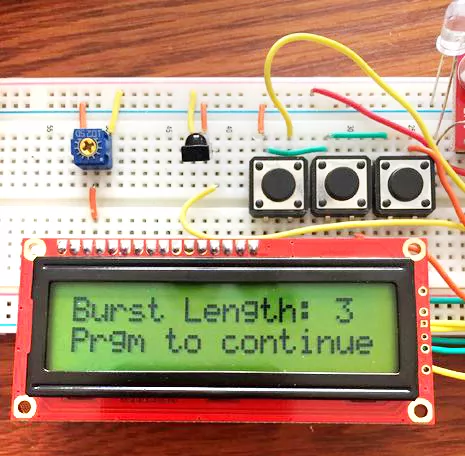
Если громкость будет превышать порог, Arduino отправит команду -Volume. Вы можете изменить «длину сигнала/пакета» или сколько команд отправляются при превышении порогового значения, нажав кнопку «Программа», затем кнопку «Вниз». На экране отобразится текущая длина пакета, которую можно изменить с помощью кнопок «Вверх» и «Вниз», а затем сохранить, нажав кнопку «Программа» еще раз.
Вся эта информация хранится в EEPROM, так что система запоминает ваши пресеты (предварительные установки), даже когда вы отключите ее от сети. В качестве другого теста на чувствительность, Arduino будет посылать команду -Volume каждый раз, когда она запускается. Таким образом, вы можете просто нажать кнопку сброса Arduino, чтобы проверить, работает ли устройство.
Шаг 5: Собираем всё вместе
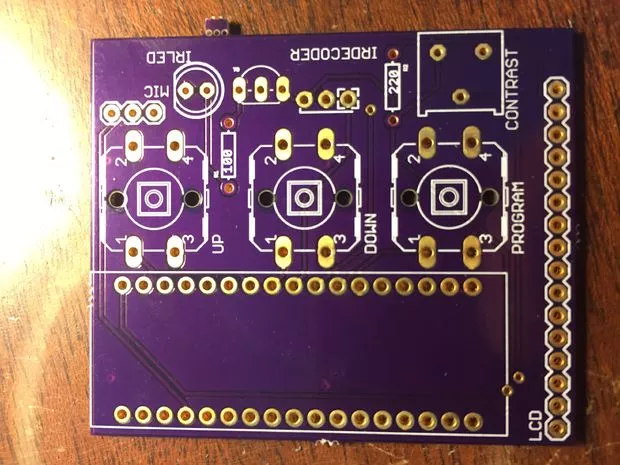
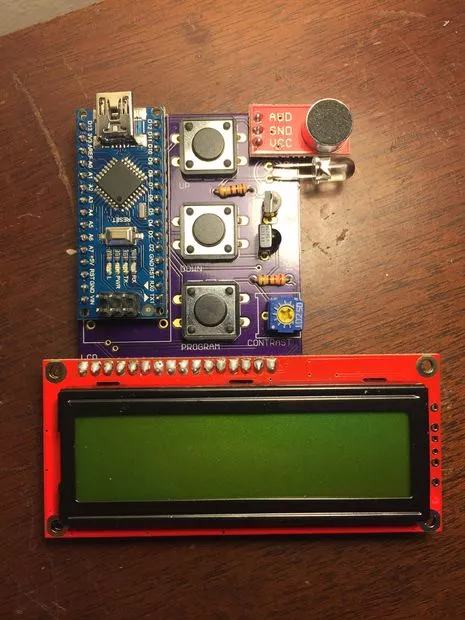
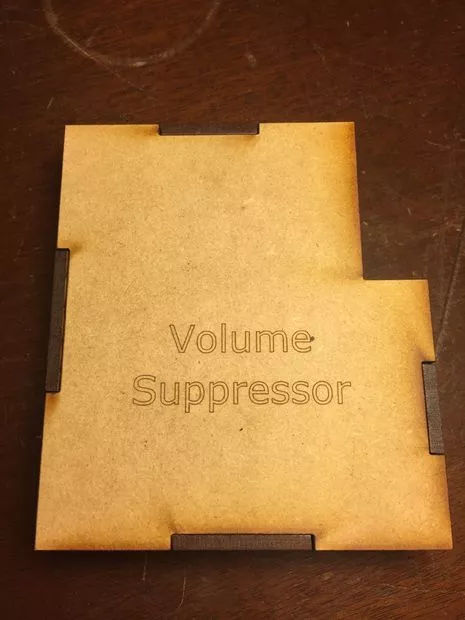
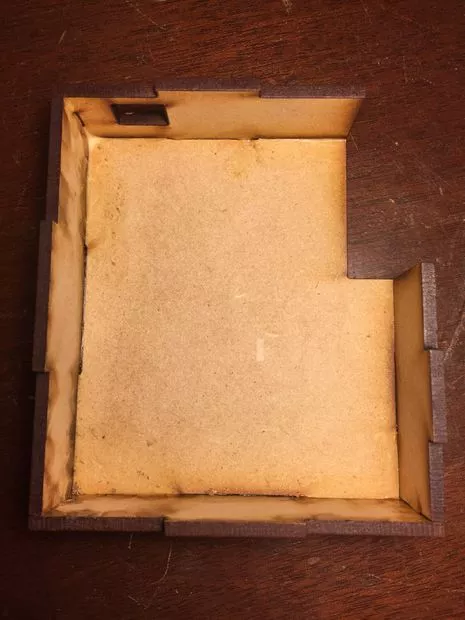
Как только мы убедились, что всё работает, мы заказали печатную плату, а затем припаял все к ней. Мы также использовал лазерные резаки, чтобы сделать небольшую коробку из ДСП для нашего устройства, но это дополнительные шаги, в которых нет прямой необходимости.
Шаг 6: Итоговое видео
Пример уменьшения громкости можно увидеть на данном видео фрагменте:
Шаг 7: Ошибки
Мы добавили этот дополнительный шаг в качестве приложения. Поскольку это был наш первый опыт в использовании Eagle и создания платы - в итоге сделали пару ошибок.
Во-первых: поскольку мы использовали клон Arduino Nano, у печатной платы на самом деле есть четыре дополнительных контакта для контроллера. Тем не менее, плата будет работать, если вы припаиваете контроллер к правильным контактам. Второе: потенциометр, поставляемый с жидкокристаллическим дисплеем, не соответствует тому, который мы использовали для проектирования платы.
Есть также несколько вещей, которые мы будем делать по-другому в будущем. Во-первых, если бы мы использовали ЖК-дисплей с подсветкой, мы бы добавили способ отключить питание ЖК-дисплея после того, как экран не был обновлен некоторое время, чтобы сэкономить электроэнергию. Во-вторых, вы можете реально удалить или уменьшить резистор 100 Ом перед ИК-светодиодом, чтобы сделать его ярче, поскольку светодиод работает только короткие промежутки времени. Однако еще предстоит проверить это. Также рекомендуем использовать микрофон с регулируемым усилением. Мы использовали микрофон Sparkfun, а он не так чувствителен, как хотелось бы.