Мы решили собрать большое руководство о том, как сделать часы на Ардуино, где расскажем о нескольких вариантах реализации такого проекта. Ранее мы уже делали электронные часы на основе этой платы.
Часы на Ардуино на основе ЖК-дисплея и часов реального времени
Цель первого урока показать, как сделать простые часы на основе Arduino с использованием ЖК-дисплея и часов реального времени.

Комплектующие
Для первого урока этого большого руководства нам понадобятся следующие комплектующие для наших часов на Ардуино:
- Arduino UNO и Genuino UNO
- PCF8563 (часы реального времени)
- Кристалл 32 кГц
- 10К потенциометры
- Резистор 10k 1/4w
- Резистор 220 Ом
- LCD 16x2
- Макет с набором проводов
В этом уроке будут использованы ЖК-дисплей и часы реального времени. Если вы хотите знать больше теме взаимодействия Arduino и ЖК-дисплеев - изучите уроки, которые мы публиковали ранее на нашем сайте.
Схема соединения
Схема очень проста. PCF8563 связывается с Arduino с помощью TWI, и когда данные принимаются, ЖК-дисплей обновляется, показывая новое время.

Установка даты и времени
Чтобы установить дату и время, используйте следующий скетч:
/* Демонстрация установки времени Rtc_Pcf8563.
* Установите часы на время затем зациклите время чтения
* и выведите дату и время на последовательную консоль.
*
* Использовали RBBB с Arduino IDE, распиновка
* немного отличается. Поменяйте на свои hw
* SCK - A5, SDA - A4, INT - D3/INT1
*
* После загрузки и запуска скетча используйте последовательный монитор
* для просмотра часов.
*
* настройка: смотрите тех. спецификацию Pcf8563.
* 1x 10 КОм на Pin3 INT
* Нет соединений на Pin5 или Pin6 (используем внутренние устройства I2C)
* 1x 0.1pf на питание
* 1x 32khz кристал
*
*/
#include <Wire.h>
#include <Rtc_Pcf8563.h>
//инициализировать часы реального времени
Rtc_Pcf8563 rtc;
void setup()
{
//очистить регистры
rtc.initClock();
//установка начального времени.
//день, неделя, месяц, век(1=1900, 0=2000), year(0-99)
rtc.setDate(14, 6, 3, 1, 10);
//часы, минуты, секунды
rtc.setTime(1, 15, 0);
}
void loop()
{
//обе функции форматирования вызывают внутренний метод getTime(),
//поэтому форматированные строки соответствуют текущем времени/дате.
Serial.print(rtc.formatTime());
Serial.print("\r\n");
Serial.print(rtc.formatDate());
Serial.print("\r\n");
delay(1000);
}
Код проекта
Теперь вы сможете использовать свои часы, загрузив этот скетч на Arduino:
#include <Wire.h>
#include <Rtc_Pcf8563.h>
// include the RTC library
#include <LiquidCrystal.h>
//init the real time clock
Rtc_Pcf8563 rtc;
// initialize the library with the numbers of the interface pins
LiquidCrystal lcd(12, 11, 5, 4, 3, 2);
void setup() {
// set up the LCD's number of columns and rows:
lcd.begin(16, 2);
lcd.print(" Arduino Clock!");
while(1500 - millis() > 0);
pinMode(13, OUTPUT);
}
void loop() {
lcd.setCursor(0, 0);
lcd.print("Date: ");
lcd.print(rtc.formatDate());
lcd.setCursor(0, 1);
lcd.print("Time: ");
lcd.print(rtc.formatTime());
}
Часы с выводом на экран Nokia 5110
Следующий урок - часы на Arduino, которые также простые для сборки, где вы сможете установить дату и время на последовательном мониторе.
В этом уроке используются лишь несколько компонентов - только перемычки, Arduino и дисплей Nokia 5110/3110.

Комплектующие
Детали, используемые в этом проекте ниже.
Оборудование
- Arduino UNO и Genuino UNO × 1
- Adafruit дисплей Nokia 5110 × 1
- Соединительные провода (универсальные) × 1
- Резистор 221 Ом × 1
Программное обеспечение
Схема соединения

Соединяем детали часов на Ардуино как на схеме выше:
- контакт pin 3 - последовательный тактовый выход (SCLK) // pin 3 - Serial clock out (SCLK)
- контакт pin 4 - выход серийных данных (DIN) // pin 4 - Serial date out (DIN)
- контакт pin 5 - дата / выбор команды (D / C) // pin 5 - date/Command select (D/C)
- контакт pin 6 - выбор ЖК-чипа (CS / CE) // pin 6 - LCD chip select (CS/CE)
- контакт pin 7 - сброс ЖК (RST) // pin 7 - LCD reset (RST)
Код урока
Код второй версии часов вы можете скачать или скопировать ниже.
#include <Adafruit_GFX.h>
#include <Adafruit_PCD8544.h>
Adafruit_PCD8544 display = Adafruit_PCD8544(3,4,5,6,7);
int second,minute, hour, day, mounth,year;
unsigned long UtlTime;
void setup()
pinMode(2,OUTPUT);
UtlTime=0; {
minute=0;
hour=0;
day=0;
mounth=0;
year=0;
Serial.begin(9600);
display.begin();
display.setContrast(50); // Adjust the display contrast
display.clearDisplay(); //Apaga o buffer e o display
display.setTextSize(1); //Seta o tamanho do texto
display.setTextColor(BLACK); //Seta a cor do texto
display.print(" date e hour ");
display.setCursor(0,10);
display.print(" com Arduino");
display.display();
delay (5000);
//Configura o minute
display.clearDisplay();
display.setCursor(0,0);
display.print("minute: ");
display.display();
Serial.print("\nin between minute:");
while(minute==0) {
if (Serial.available() > 0)
{
minute= Serial.parseInt();
}
}
display.print(minute);
display.display();
delay(1000);
//Configura a hour
display.clearDisplay();
display.setCursor(0,0);
display.print("hour: ");
display.display();
Serial.print("\nin between hour:");
while(hour==0)
{
if (Serial.available() > 0)
{
hour= Serial.parseInt();
}
}
display.print(hour);
display.display();
delay(1000);
//Configura o day
display.clearDisplay();
display.setCursor(0,0);
display.print("day: ");
display.display();
Serial.print("\nin between day:");
while(day==0)
{
if (Serial.available() > 0)
{
day= Serial.parseInt();
}
}
display.print(day);
display.display();
delay(1000);
//Configura o mês
display.clearDisplay();
display.setCursor(0,0);
display.print("mounth: ");
display.display();
Serial.print("\nin between mounth:");
while(mounth==0)
{
if (Serial.available() > 0)
{
mounth= Serial.parseInt();
}
}
display.print(mounth);
display.display();
delay(1000);
//Configura o year
display.clearDisplay();
display.setCursor(0,0);
display.print("year: ");
display.display();
Serial.print("\nin between year:");
while(year==0)
{
if (Serial.available() > 0)
{
year= Serial.parseInt();
}
}
display.print(year);
display.display();
delay(1000);
display.clearDisplay();
}
void loop()
{
if(millis()-UtlTime<0)
{
UtlTime=millis();
}
else
{
second=int((millis()-UtlTime)/1000);
}
if(second>59)
{
second=0;
minute++;
UtlTime=millis();
if(minute>59)
{
hour++;
minute=0;
if(hour>23)
{
day++;
hour=0;
if(mounth==1||mounth==3||mounth==5||mounth==7||mounth==8||mounth==10||mounth==12)
{
if(day>31)
{
day=1;
mounth++;
if(mounth>12)
{
year++;
mounth=1;
}
}
}
else if(mounth==2)
{
if(year%400==0)
{
if(day>29)
{
day=1;
mounth++;
}
}
else if((year%4==0)&&(year%100!=0))
{
if(day>29)
{
day=1;
mounth++;
}
}
else
{
if(day>28)
{
day=1;
mounth++;
}
}
}
else
{
if(day>30)
{
day=1;
mounth++;
}
}
}
}
}
display.clearDisplay();
delay(1000);
Serial.print(day);
Serial.print("/");
Serial.print(mounth);
Serial.print("/");
Serial.print(year);
Serial.println();
display.setCursor(0,0);
display.print("date ");
display.print(day);
display.print("/");
display.print(mounth);
display.print("/");
display.print(year);
display.display();
Serial.print(hour);
Serial.print(":");
Serial.print(minute);
Serial.print(":");
Serial.print(second);
Serial.print("\n");
Serial.println();
display.setCursor(0,10);
display.print("hour ");
display.print(hour);
display.print(":");
display.print(minute);
display.print(":");
display.print(second);
display.display();
char tecla;
tecla = Serial.read();
if(tecla=='1'){
digitalWrite(2,LOW);
}
if(tecla=='2'){
digitalWrite(2, HIGH);
}
}
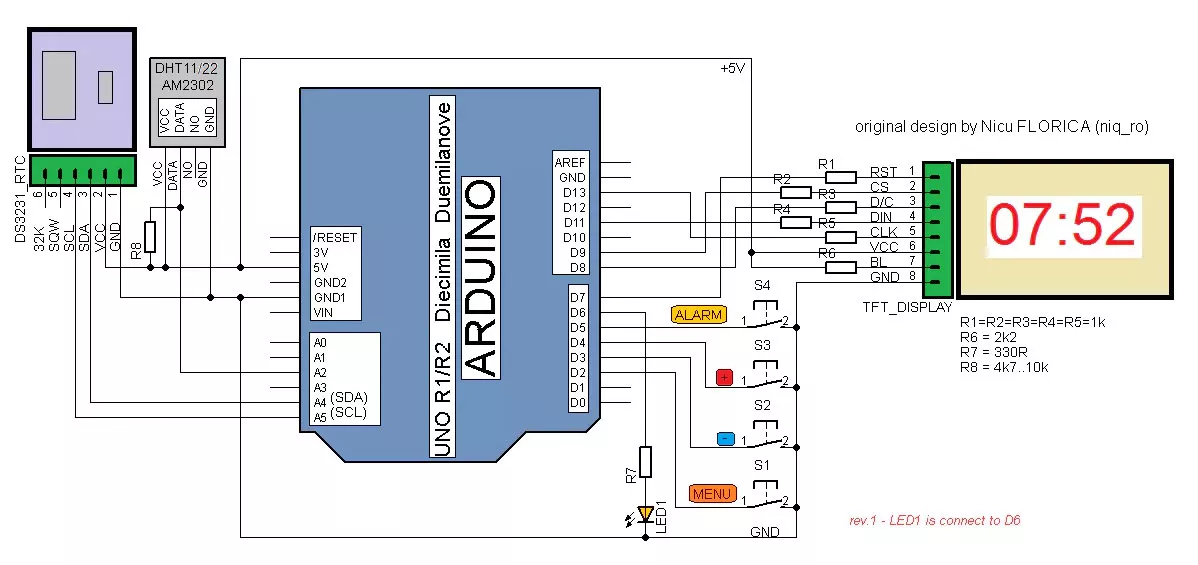
Часы с будильником, гигрометром и термометром
Эти часы сделаны с использованием платы Arduino Uno, датчика AM2302, модуля RTC DS3231 и TFT-дисплей 1,8" с ST7735.

Комплектующие
Компоненты, используемые в третьей версии часов на Ардуино перечислены ниже.
Компоненты оборудования
- Arduino UNO и Genuino UNO × 1
- Часы реального времени (RTC) × 1
- Датчик температуры DHT22 × 1
- Кнопочный переключатель 12мм
- SparkFun Кнопочный переключатель 12 мм × 4
- Соединительные провода (универсальные) × 1
- Макет (универсальный) × 1
- Adafruit ST7735 1,8 "дисплей × 1
Программное обеспечение
- Arduino IDE

Схема соединения
Соедините все детали часов согласно схеме ниже.
Код урока
Скачайте или скопируйте код часов для Ардуино ниже и загрузите на плату используя Arduino IDE.
#include <Adafruit_ST7735.h>
#include <Adafruit_GFX.h>
#include <Wire.h>
#include <SPI.h>
#include "EEPROM.h"
#define TFT_CS 9
#define TFT_RST 7
#define TFT_DC 8
Adafruit_ST7735 tft = Adafruit_ST7735(TFT_CS, TFT_DC, TFT_RST);
// Option 2: use any pins but a little slower!
#define TFT_SCLK 13 // set these to be whatever pins you like!
#define TFT_MOSI 11 // set these to be whatever pins you like!
float maxTemperature=0;
float minTemperature=200;
char charMinTemperature[10];
char charMaxTemperature[10];
char timeChar[100];
char dateChar[50];
char temperatureChar[10];
float temperature = 0;
float previousTemperature = 0;
String dateString;
int minuteNow=0;
int minutePrevious=0;
#define DS3231_I2C_ADDRESS 104
byte tMSB, tLSB;
float temp3231;
float temperatura, temperatura0;
byte hh, mm, ss;
byte yy, ll, dd, zz;
#define meniu 2
#define minus 3
#define plus 4
#define alarm 5
#define buzzer 6
int nivel = 0; // if is 0 - clock
// if is 1 - hour adjust
// if is 2 - minute adjust
int hh1, mm1, zz1, dd1, ll1, yy1;
int maxday;
boolean initial = 1;
char chartemp[3];
int hha, mma; // for alarm
byte al; // for alarm
byte xa = 80;
byte ya = 70;
#include "DHT.h"
#define DHTPIN 16 // what pin we're connected to
// Uncomment whatever type you're using!
//#define DHTTYPE DHT11 // DHT 11
#define DHTTYPE DHT22 // DHT 22 (AM2302)
//#define DHTTYPE DHT21 // DHT 21 (AM2301)
// Connect pin 1 (on the left) of the sensor to +5V
// NOTE: If using a board with 3.3V logic like an Arduino Due connect pin 1
// to 3.3V instead of 5V!
// Connect pin 2 of the sensor to whatever your DHTPIN is
// Connect pin 4 (on the right) of the sensor to GROUND
// Connect a 10K resistor from pin 2 (data) to pin 1 (power) of the sensor
// Initialize DHT sensor for normal 16mhz Arduino
DHT dht(DHTPIN, DHTTYPE);
// NOTE: For working with a faster chip, like an Arduino Due or Teensy, you
// might need to increase the threshold for cycle counts considered a 1 or 0.
// You can do this by passing a 3rd parameter for this threshold. It's a bit
// of fiddling to find the right value, but in general the faster the CPU the
// higher the value. The default for a 16mhz AVR is a value of 6. For an
// Arduino Due that runs at 84mhz a value of 30 works.
// Example to initialize DHT sensor for Arduino Due:
//DHT dht(DHTPIN, DHTTYPE, 30);
//float temperatura;
int umiditate;
int tzeci, tunit, tzecimi, trest;
int tsemn, ttot;
int hzeci, hunit;
int previousHumidity = 0;
char umiditateChar[10];
unsigned long masurare;
unsigned long intervalmasurare = 30000;
void setup ()
{
dht.begin();
tft.initR(INITR_BLACKTAB);
tft.fillScreen(ST7735_BLACK);
Serial.begin(9600);
Wire.begin();
pinMode(meniu, INPUT);
pinMode(plus, INPUT);
pinMode(minus, INPUT);
pinMode(alarm, INPUT);
pinMode(buzzer, OUTPUT);
digitalWrite(meniu, HIGH); // put inputs in high state (when push is to ground -> low state)
digitalWrite(plus, HIGH);
digitalWrite(minus, HIGH);
digitalWrite(alarm, HIGH);
digitalWrite(buzzer, LOW);
printText("TEMPERATURE", ST7735_GREEN,5,85,1); // Temperature Static Text
printText("HUMIDITY", ST7735_RED,5,130,1);
// setDS3231time(byte second, byte minute, byte hour, byte dayOfWeek, byte dayOfMonth, byte month, byte year);
//setDS3231time(0, 45, 13, 0, 25, 11, 2016;
// hha = 7;
// mma = 00;
// al = 1; // 0 = alarm is off (must put in 1 foar active)
hha = EEPROM.read(100);
mma = EEPROM.read(101);
al = EEPROM.read(102);
if ((hha < 0) || (hha > 23)) hha = 7;
if ((mma < 0) || (mma > 59)) mma = 0;
if ((al < 0) || (al > 1)) al = 0;
//temperature = dht.readTemperature();
//umiditate = dht.readHumidity();
masurare = millis();
}
void loop ()
{
if (nivel == 0)
{
if (digitalRead(meniu) == LOW)
{
nivel = nivel+1;
hh1=hh;
mm1=mm;
zz1=zz;
yy1=yy;
ll1=ll;
dd1=dd;
delay(500);
tft.fillScreen(ST7735_BLACK);
tft.fillRect(0,0,128,160,ST7735_BLACK);
}
if (((millis() - masurare) > intervalmasurare) || initial)
{
temperature = dht.readTemperature();
umiditate = dht.readHumidity();
delay(500);
masurare = millis();
}
readDS3231time(&ss, &mm, &hh, &zz, &dd, &ll,&yy);
String halarma = "";
if(hha<10)
{
halarma = halarma+" "+String(hha);
}else
halarma = halarma+ String(hha);
if(mma<10)
{
halarma = halarma+":0"+String(mma);
}else
{
halarma = halarma+":"+String(mma);
}
halarma.toCharArray(timeChar,100);
if (digitalRead(alarm) == LOW)
{
al = al + 1;
EEPROM.write(102, al%2);
delay(500);
}
if (mma == mm & hha == hh & al%2)
{
digitalWrite(buzzer, HIGH);
tft.drawCircle(xa, ya, 5, ST7735_RED);
tft.drawLine(xa, ya, xa, ya-5, ST7735_RED);
tft.drawLine(xa, ya, xa+4, ya+4, ST7735_RED);
printText(timeChar, ST7735_RED,xa+7,ya,1);
}
else
{
if (al%2 == 0)
{
tft.drawCircle(xa, ya, 5, ST7735_BLUE);
tft.drawLine(xa, ya, xa, ya-5, ST7735_BLUE);
tft.drawLine(xa, ya, xa+4, ya+4, ST7735_BLUE);
digitalWrite(buzzer, LOW);
printText(timeChar, ST7735_BLUE,xa+7,ya,1);
}
if (al%2 == 1)
{
tft.drawCircle(xa, ya, 5, ST7735_WHITE);
tft.drawLine(xa, ya, xa, ya-5, ST7735_WHITE);
tft.drawLine(xa, ya, xa+4, ya+4, ST7735_WHITE);
digitalWrite(buzzer, LOW);
printText(timeChar, ST7735_WHITE,xa+7,ya,1);
}
}
minuteNow = mm;
if(minuteNow!=minutePrevious || initial)
{
initial = 0;
dateString = getDayOfWeek(zz)+", ";
dateString = dateString+String(dd)+"/"+String(ll);
dateString= dateString+"/"+ String(yy);
minutePrevious = minuteNow;
String hours = "";
if(hh<10)
{
hours = hours+" "+String(hh);
}else
hours = hours+ String(hh);
if(mm<10)
{
hours = hours+" 0"+String(mm);
}else
{
hours = hours+" "+String(mm);
}
hours.toCharArray(timeChar,100);
tft.fillRect(0,0,160,65,ST7735_BLACK);
// printText(timeChar, ST7735_WHITE,20,25,3);
printText(timeChar, ST7735_YELLOW,5,25,4);
dateString.toCharArray(dateChar,50);
printText(dateChar, ST7735_GREEN,8,5,1);
}
if ((temperature != previousTemperature) || initial)
{
previousTemperature = temperature;
String temperatureString = String(temperature,1);
temperatureString.toCharArray(temperatureChar,10);
tft.fillRect(0,98,128,27,ST7735_BLACK);
printText(temperatureChar, ST7735_WHITE,10,100,3);
printText("o", ST7735_WHITE,90,95,2);
printText("C", ST7735_WHITE,105,100,3);
if((umiditate != previousHumidity) || initial)
{
previousHumidity = umiditate;
String umiditateString = String(umiditate);
umiditateString.toCharArray(umiditateChar,10);
tft.fillRect(55,130,128,27,ST7735_BLACK);
printText(umiditateChar, ST7735_WHITE,55,130,3);
printText("%RH", ST7735_WHITE,91,130,2);
}
}
delay(500);
// printText("o", ST7735_WHITE,62,28,1);
// printText("o", ST7735_WHITE,62,35,1);
printText("o", ST7735_YELLOW,62,28,1);
printText("o", ST7735_YELLOW,62,35,1);
delay(500);
printText("o", ST7735_BLACK,62,28,1);
printText("o", ST7735_BLACK,62,35,1);
} // end usual case (clock)
if (nivel == 1) // change hours
{
if (digitalRead(meniu) == LOW)
{
nivel = nivel+1;
delay(500);
tft.fillScreen(ST7735_BLACK);
tft.fillRect(0,0,128,160,ST7735_BLACK);
}
printText("SETTING", ST7735_GREEN,10,18,2); // Temperature Static Text
printText("HOUR:", ST7735_GREEN,10,36,2); // Temperature Static Text
dtostrf(hh1,3, 0, chartemp);
//tft.fillRect(50,50,70,18,ST7735_BLACK);
tft.fillRect(50,50,70,38,ST7735_BLACK);
delay(50);
printText(chartemp, ST7735_WHITE,60,50,2);
delay(50);
if (digitalRead(plus) == LOW)
{
hh1 = hh1+1;
delay(150);
}
if (digitalRead(minus) == LOW)
{
hh1 = hh1-1;
delay(150);
}
if (hh1 > 23) hh1 = 0;
if (hh1 < 0) hh1 = 23;
} // end loop nivel = 1 (change the hours)
if (nivel == 2) // change minutes
{
if (digitalRead(meniu) == LOW)
{
nivel = nivel+1;
delay(500);
tft.fillScreen(ST7735_BLACK);
tft.fillRect(0,0,128,160,ST7735_BLACK);
}
printText("SETTING", ST7735_GREEN,10,18,2); // Temperature Static Text
tft.fillRect(10,35,70,18,ST7735_BLACK);
printText("MINUTE:", ST7735_GREEN,10,35,2); // Temperature Static Text
Serial.println(mm1);
dtostrf(mm1,3, 0, chartemp);
tft.fillRect(50,50,70,18,ST7735_BLACK);
delay(50);
printText(chartemp, ST7735_WHITE,60,50,2);
delay(50);
if (digitalRead(plus) == LOW)
{
mm1 = mm1+1;
delay(150);
}
if (digitalRead(minus) == LOW)
{
mm1 = mm1-1;
delay(150);
}
if (mm1 > 59) mm1 = 0;
if (mm1 < 0) mm1 = 59;
} // end loop nivel = 2 (change the minutes)
if (nivel == 3) // change day in week
{
if (digitalRead(meniu) == LOW)
{
nivel = nivel+1;
delay(500);
tft.fillScreen(ST7735_BLACK);
tft.fillRect(0,0,128,160,ST7735_BLACK);
}
printText("SETTING", ST7735_GREEN,10,18,2); // Temperature Static Text
tft.fillRect(0,35,128,18,ST7735_BLACK);
printText("Day in Week:", ST7735_GREEN,10,40,1); // Temperature Static Text
//Serial.println(mm1);
dtostrf(zz1,3, 0, chartemp);
tft.fillRect(50,50,70,18,ST7735_BLACK);
delay(50);
printText(chartemp, ST7735_WHITE,60,50,2);
tft.fillRect(10,80,100,18,ST7735_BLACK);
if (zz1 == 1) printText("1 - Monday", ST7735_RED,10,80,1); // Temperature Static Text
if (zz1 == 2) printText("2 - Tuesday", ST7735_RED,10,80,1); // Temperature Static Text
if (zz1 == 3) printText("3 - Wednesday", ST7735_RED,10,80,1); // Temperature Static Text
if (zz1 == 4) printText("4 - Thursday", ST7735_RED,10,80,1); // Temperature Static Text
if (zz1 == 5) printText("5 - Friday", ST7735_RED,10,80,1); // Temperature Static Text
if (zz1 == 6) printText("6 - Saturday", ST7735_RED,10,80,1); // Temperature Static Text
if (zz1 == 0) printText("0 - Sunday", ST7735_RED,10,80,1); // Temperature Static Text
delay(50);
if (digitalRead(plus) == LOW)
{
zz1 = zz1+1;
delay(150);
}
if (digitalRead(minus) == LOW)
{
zz1 = zz1-1;
delay(150);
}
if (zz1 > 6) zz1 = 0;
if (zz1 < 0) zz1 = 6;
} // end loop nivel = 3 (change the day of the week)
if (nivel == 4) // change year
{
if (digitalRead(meniu) == LOW)
{
nivel = nivel+1;
delay(500);
tft.fillScreen(ST7735_BLACK);
tft.fillRect(0,0,128,160,ST7735_BLACK);
tft.fillRect(10,80,100,18,ST7735_BLACK);
}
printText("SETTING", ST7735_GREEN,10,18,2); // Temperature Static Text
tft.fillRect(10,35,70,18,ST7735_BLACK);
printText("YEAR:", ST7735_GREEN,10,35,2); // Temperature Static Text
dtostrf(yy1,3, 0, chartemp);
tft.fillRect(40,50,80,18,ST7735_BLACK);
tft.fillRect(10,80,100,18,ST7735_BLACK); // erase last explication...
delay(50);
printText("20", ST7735_WHITE,45,50,2);
printText(chartemp, ST7735_WHITE,60,50,2);
delay(50);
if (digitalRead(plus) == LOW)
{
yy1 = yy1+1;
delay(150);
}
if (digitalRead(minus) == LOW)
{
yy1 = yy1-1;
delay(150);
}
if (yy1 > 49) yy1 = 49;
if (yy1 < 16) yy1 = 16;
} // end loop stare = 4 (change the year)
if (nivel == 5) // change mounth
{
if (digitalRead(meniu) == LOW)
{
nivel = nivel+1;
delay(500);
tft.fillScreen(ST7735_BLACK);
tft.fillRect(10,80,100,18,ST7735_BLACK);
}
printText("SETTING", ST7735_GREEN,10,18,2); // Temperature Static Text
tft.fillRect(10,35,70,18,ST7735_BLACK);
printText("MONTH:", ST7735_GREEN,10,35,2); // Temperature Static Text
dtostrf(ll1,3, 0, chartemp);
tft.fillRect(40,50,80,18,ST7735_BLACK);
tft.fillRect(10,80,100,18,ST7735_BLACK); // erase last explication...
delay(50);
printText(chartemp, ST7735_WHITE,60,50,2);
delay(50);
if (digitalRead(plus) == LOW)
{
ll1 = ll1+1;
delay(150);
}
if (digitalRead(minus) == LOW)
{
ll1 = ll1-1;
delay(150);
}
if (ll1 > 12) ll1 = 1;
if (ll1 < 1) ll1 = 12;
} // end loop stare = 5 (change the day as data)
if (nivel == 6) // change day as data
{
if (digitalRead(meniu) == LOW)
{
nivel = nivel+1;
delay(500);
tft.fillScreen(ST7735_BLACK);
tft.fillRect(10,80,100,18,ST7735_BLACK);
}
printText("SETTING", ST7735_GREEN,10,18,2); // Temperature Static Text
tft.fillRect(10,35,70,18,ST7735_BLACK);
printText("DAY:", ST7735_GREEN,10,35,2); // Temperature Static Text
dtostrf(dd1,3, 0, chartemp);
tft.fillRect(50,50,70,18,ST7735_BLACK);
tft.fillRect(10,80,100,18,ST7735_BLACK); // erase last explication...
delay(50);
printText(chartemp, ST7735_WHITE,60,50,2);
delay(50);
if (digitalRead(plus) == LOW)
{
dd1 = dd1+1;
delay(150);
}
if (digitalRead(minus) == LOW)
{
dd1 = dd1-1;
delay(150);
}
// Dawn & Dusk controller. http://andydoz.blogspot.ro/2014_08_01_archive.html
if (ll == 4 || ll == 5 || ll == 9 || ll == 11) { //30 days hath September, April June and November
maxday = 30;
}
else {
maxday = 31; //... all the others have 31
}
if (ll ==2 && yy % 4 ==0) { //... Except February alone, and that has 28 days clear, and 29 in a leap year.
maxday = 29;
}
if (ll ==2 && ll % 4 !=0) {
maxday = 28;
}
if (dd1 > maxday) dd1 = 1;
if (dd1 < 1) dd1 = maxday;
} // end loop nivel = 6 (change the day as data)
if (nivel == 7) // change hours alarm
{
if (digitalRead(meniu) == LOW)
{
nivel = nivel+1;
delay(500);
tft.fillScreen(ST7735_BLACK);
tft.fillRect(0,0,128,160,ST7735_BLACK);
}
tft.fillRect(10,15,100,38,ST7735_BLACK);
printText("ALARM", ST7735_GREEN,10,18,2); // Temperature Static Text
printText("HOUR:", ST7735_GREEN,10,36,2); // Temperature Static Text
dtostrf(hha,3, 0, chartemp);
//tft.fillRect(50,50,70,18,ST7735_BLACK);
tft.fillRect(50,50,70,38,ST7735_BLACK);
delay(50);
printText(chartemp, ST7735_WHITE,60,50,2);
delay(50);
if (digitalRead(plus) == LOW)
{
hha = hha+1;
delay(150);
}
if (digitalRead(minus) == LOW)
{
hha = hha-1;
delay(150);
}
if (hha > 23) hha = 0;
if (hha < 0) hha = 23;
} // end loop nivel = 7 (change the hours)
if (nivel == 8) // change minutes for alarm
{
if (digitalRead(meniu) == LOW)
{
nivel = nivel+1;
delay(500);
tft.fillScreen(ST7735_BLACK);
tft.fillRect(0,0,128,160,ST7735_BLACK);
}
tft.fillRect(10,15,70,18,ST7735_BLACK);
printText("ALARM", ST7735_GREEN,10,18,2); // Temperature Static Text
tft.fillRect(10,35,70,18,ST7735_BLACK);
printText("MINUTE:", ST7735_GREEN,10,35,2); // Temperature Static Text
Serial.println(mm1);
dtostrf(mma,3, 0, chartemp);
tft.fillRect(50,50,70,18,ST7735_BLACK);
delay(50);
printText(chartemp, ST7735_WHITE,60,50,2);
delay(50);
if (digitalRead(plus) == LOW)
{
mma = mma+1;
delay(150);
}
if (digitalRead(minus) == LOW)
{
mma = mma-1;
delay(150);
}
if (mma > 59) mma = 0;
if (mma < 0) mma = 59;
} // end loop nivel = 8 (change the minutes)
if (nivel >=9) // readfy to return to main loop
{
setDS3231time(0, mm1, hh1, zz1, dd1, ll1, yy1);
EEPROM.write(100, hha);
EEPROM.write(101, mma);
EEPROM.write(102, al%2);
nivel = 0;
previousTemperature= 0.0;
previousHumidity= 0;
initial = 1;
printText("TEMPERATURE", ST7735_GREEN,5,85,1); // Temperature Static Text
printText("HUMIDITY", ST7735_RED,5,130,1);
}
} // end main loop
void printText(char *text, uint16_t color, int x, int y,int textSize)
{
tft.setCursor(x, y);
tft.setTextColor(color);
tft.setTextSize(textSize);
tft.setTextWrap(true);
tft.print(text);
}
String getDayOfWeek(int i)
{
switch(i)
{
case 0: return "Monday";break;
case 1: return "Tuesday";break;
case 2: return "Wednesday";break;
case 3: return "Thursday";break;
case 4: return "Friday";break;
case 5: return "Saturday";break;
case 6: return "Sunday";break;
default: return "Monday";break;
}
}
// http://forum.arduino.cc/index.php?topic=398891.0
void setDS3231time(byte second, byte minute, byte hour, byte dayOfWeek, byte
dayOfMonth, byte month, byte year)
{
// sets time and date data to DS3231
Wire.beginTransmission(DS3231_I2C_ADDRESS);
Wire.write(0); // set next input to start at the seconds register
Wire.write(decToBcd(second)); // set seconds
Wire.write(decToBcd(minute)); // set minutes
Wire.write(decToBcd(hour)); // set hours
Wire.write(decToBcd(dayOfWeek)); // set day of week (1=Sunday, 7=Saturday)
Wire.write(decToBcd(dayOfMonth)); // set date (1 to 31)
Wire.write(decToBcd(month)); // set month
Wire.write(decToBcd(year)); // set year (0 to 99)
Wire.endTransmission();
}
// Convert binary coded decimal to normal decimal numbers
byte bcdToDec(byte val)
{
return ( (val / 16 * 10) + (val % 16) );
}
// Convert normal decimal numbers to binary coded decimal
byte decToBcd(byte val)
{
return ( (val / 10 * 16) + (val % 10) );
}
void readDS3231time(byte *second,
byte *minute,
byte *hour,
byte *dayOfWeek,
byte *dayOfMonth,
byte *month,
byte *year)
{
Wire.beginTransmission(DS3231_I2C_ADDRESS);
Wire.write(0); // set DS3231 register pointer to 00h
Wire.endTransmission();
Wire.requestFrom(DS3231_I2C_ADDRESS, 7);
// request seven bytes of data from DS3231 starting from register 00h
*second = bcdToDec(Wire.read() & 0x7f);
*minute = bcdToDec(Wire.read());
*hour = bcdToDec(Wire.read() & 0x3f);
*dayOfWeek = bcdToDec(Wire.read());
*dayOfMonth = bcdToDec(Wire.read());
*month = bcdToDec(Wire.read());
*year = bcdToDec(Wire.read());
}
Часы без RTC
Для начала мы должны понимать, что такое RTC. Из Википедии:
В итоге в данной версии мы сделаем часы без RTC с индикатором температуры и влажности на Arduino с помощью модуля DHT11. Также мы используем 3 кнопки для установки часов.
Комплектующие
Вам понадобятся эти кусочки для этого проекта:
- Arduino Uno плата
- Кнопки 3 шт.
- Потенциометр
- Модуль LCD 1602
- Модуль температуры и влажности DHT11
- Макетная плата
- Перемычки
Схема соединения
Соедините комплектующие часов как на схеме ниже.

Код
Вы можете скопировать или скачать код часов на Ардуино ниже.
#include <LiquidCrystal.h>
#include <SimpleDHT.h>
// initialize the library with the numbers of the interface pins
LiquidCrystal lcd(7, 8, 9, 10, 11, 12);
volatile int sec, minute = 0, hour = 0;
int b_h = 5;
int b_m = 6;
int pinDHT11 = 2;
int b_startstop = 3;
bool startstop = false;
SimpleDHT11 dht11;
void setup() {
// set up the LCD's number of columns and rows:
lcd.begin(16, 2);
lcd.setCursor(0, 0);
lcd.print("Ahmad Ordikhani");
lcd.setCursor(0, 1);
lcd.print("Clk without RTC");
delay(3000);
lcd.clear();
pinMode(b_h, INPUT_PULLUP);
pinMode(b_m, INPUT_PULLUP);
pinMode(b_startstop, INPUT_PULLUP);
attachInterrupt(digitalPinToInterrupt(3), buttons, FALLING);
}
void loop() {
//Setting the time will stop the clock to set the time
while (startstop == false)
{
lcd.setCursor(0, 1);
lcd.print("SET");
delay(100);
lcd.setCursor(0, 0);
lcd.print("Time: ");
if(hour<10)
{
lcd.print("0");
lcd.print(hour);
}
else
lcd.print(hour);
lcd.print(":");
if(minute<10)
{
lcd.print("0");
lcd.print(minute);
}
else
lcd.print(minute);
lcd.print(":");
if(sec<10)
{
lcd.print("0");
lcd.print(sec);
}
else
lcd.print(sec);
lcd.print(" ");
if (digitalRead(b_h) == LOW)
{
hour++;
if (hour > 23)
hour = 0;
}
if (digitalRead(b_m) == LOW)
{
minute++;
if (minute > 59)
minute = 0;
}
}
//Start the clock
while (startstop == true)
{
// noInterrupts();
// read with raw sample data.
byte temperature = 0;
byte humidity = 0;
byte data[40] = {0};
if (dht11.read(pinDHT11, &temperature, &humidity, data)) {
lcd.setCursor(0, 1);
lcd.print("Read DHT11 failed");
return;
}
lcd.setCursor(0, 1);
lcd.print("Temp:");
lcd.print((int)temperature);
//lcd.print("*C");
lcd.print(" ");
lcd.print("Hum.:");
lcd.print((int)humidity);
lcd.print("%");
//Serial.print((int)temperature); Serial.print(" *C, ");
// Serial.print((int)humidity); Serial.println(" %");
lcd.setCursor(0, 0);
//sec=millis()/1000;
delay(1000);
lcd.print("Time: ");
if (hour < 10)
{
lcd.print("0");
lcd.print(hour);
}
else
{
lcd.print(hour);
}
lcd.print(":");
if (minute < 10)
{
lcd.print("0");
lcd.print(minute);
}
else
{
lcd.print(minute);
} lcd.print(":");
if (sec < 10)
{
lcd.print("0");
lcd.print(sec);
}
else
{
lcd.print(sec);
}
lcd.print(" ");
//lcd.print(startstop);
sec++;
if (sec > 59)
{
minute++;
sec = 0;
//lcd.clear();
}
if (minute > 59)
{
hour++;
minute = 0;
//lcd.clear();
}
if (hour > 23)
{
hour = 0;
//lcd.clear();
}
}
}
//Start/Stop the clock
void buttons()
{
lcd.clear();
startstop = !startstop;
}
На этом пока всё. Мы постарались описать все основные варианты реализации часов на Ардуино.
19 августа 2020 в 21:51
Не умеете скотч писать так нехрен выкладывать,*censored*.
20 августа 2020 в 00:14
В статье 4 примера, даже непонятно о каком скетче идет речь. Но, в любом случае, вы всегда можете написать свой скетч, вы же наверняка очень умный и талантливый человек, Евгений?
20 августа 2020 в 00:17
Евгений, ждем скетч от вас. Спасибо
2 ноября 2021 в 22:53
Искал что либо для PCF8563 , поправить часы в устройстве , повторил первый материал , заработало . Из неудобств : для редактирования часиков необходимо применять 2 разных скетча , 2 прошивки ; Без ардуинки правка времени невозможна , изделие (часы) теряет свою автономность , т.е. устанавливать себе время своими кнопками (кей-пад шилд ардуино) . Хотя нужно не так много — добавить кусок кода опроса кнопок аналогового входа и интегрирования в управление редактированием дата-время . Ну и вообще будет супер — просмотр еепром содержимого этих часов . Знаний языков программирования и синтаксиса С++ почти нет , просьба к гуру — пожените оба скетча (PCF85663) , большое спасибо . Олег С.
24 декабря 2021 в 19:02
можно получить правильный скетч