Сегодня вы вряд ли кого-нибудь удивите мобильным телефоном с камерой, беспроводными гаджетами и другими техническими достижениями. Благодаря платформе Arduino миллионы людей открыли для себя удивительный мир электроники и программирования. Было написано огромное количество инструкций по обмену данными между мобильным телефоном и Arduino через Bluetooth. И да, мы хотим в очередной раз обмениваться данными между мобильным телефоном на Android и Arduino Uno через Bluetooth, но мы хотим передавать не просто набор символов и цифр, а картинки.
Кто-то скажет, что это невозможно, Arduino слишком медленно обрабатывает большие объемы данных с хорошей скоростью. И он будет абсолютно прав. А что, если немного помочь Arduino - перенести всю «тяжелую» работу на плечи другого устройства? А такое устройство существует!

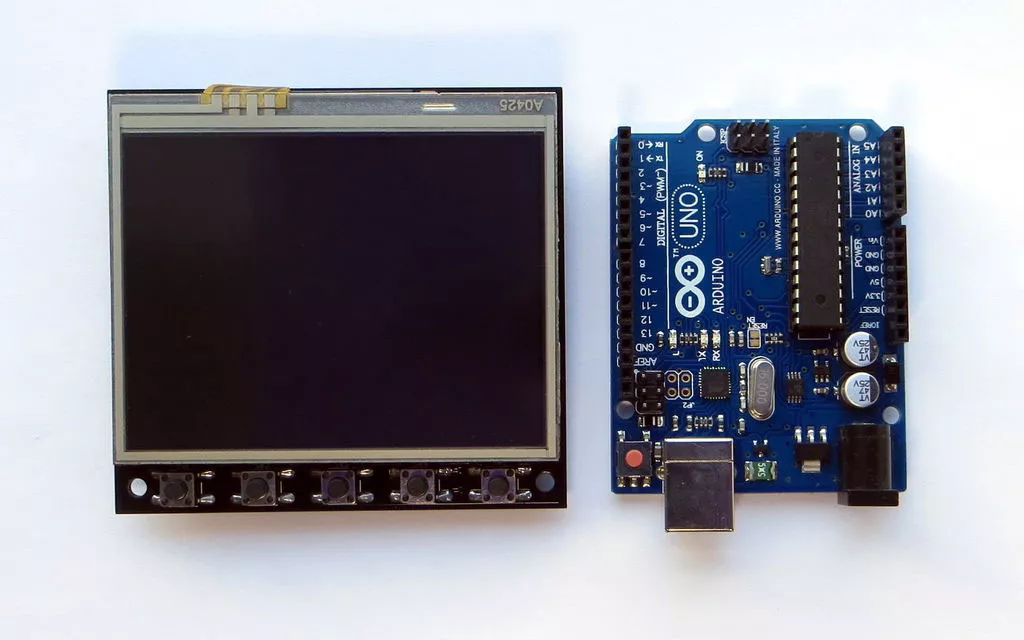
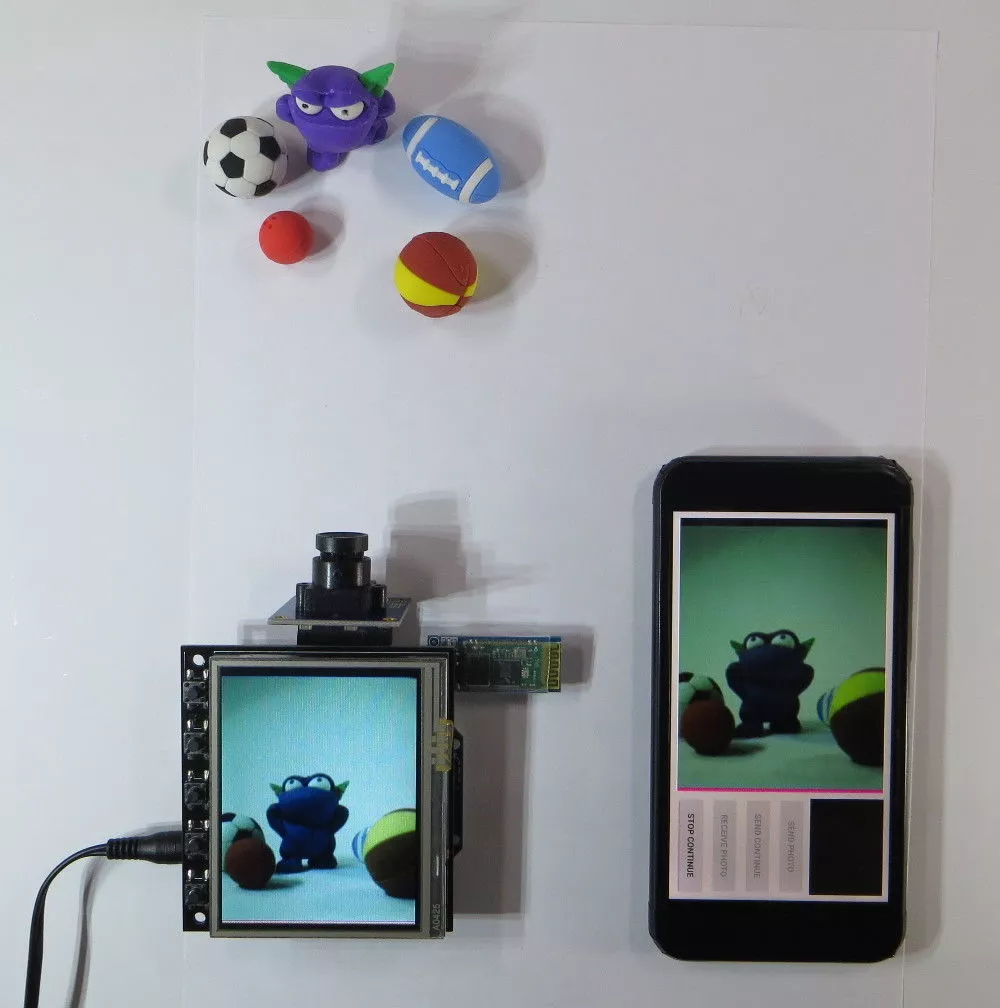
Это уникальный TFT-шилд (экран) для Arduino. В этом уроке мы продемонстрируем, как можно подключиться через Bluetooth к Arduino и телефону Android, получить изображение с камеры OV7670 на Arduino Uno и перенести его на телефон Android. Затем, наоборот, перенести изображение (изображение с камеры) с телефона Android на Arduino Uno и отобразитm его на TFT-экране. Для этого было написано специальное приложение для телефона Android. Но прежде чем начать, рекомендуем ознакомиться с нашим гидом по TFT-дисплеям.
Шаг 1. TFT-шилд для Ардуино Уно
Для начала мы остановимся на нашем TFT-шилде, который расширяет возможности Arduino Uno.
Этот урок по-сути является первым, с которого мы хотели бы начать рассказ об уникальном TFT-экране, разработанном для платформы Arduino Uno, который позволяет значительно расширить возможности Arduino Uno. Несмотря на то, что этот TFT-экран все еще находится в стадии разработки, на данный момент уже есть работающее устройство.
Характеристики
- Размер диагонали: 3,5",
- Разрешение: 320х240,
- Количество цветов: 65536 (16 бит),
- Резистивный сенсорный экран (контроллер XPT2046),
- 5 кнопок,
- RTC IC DS1307 с литиевой батареей 3В CR1220,
- Слот для подключения карты Micro SD,
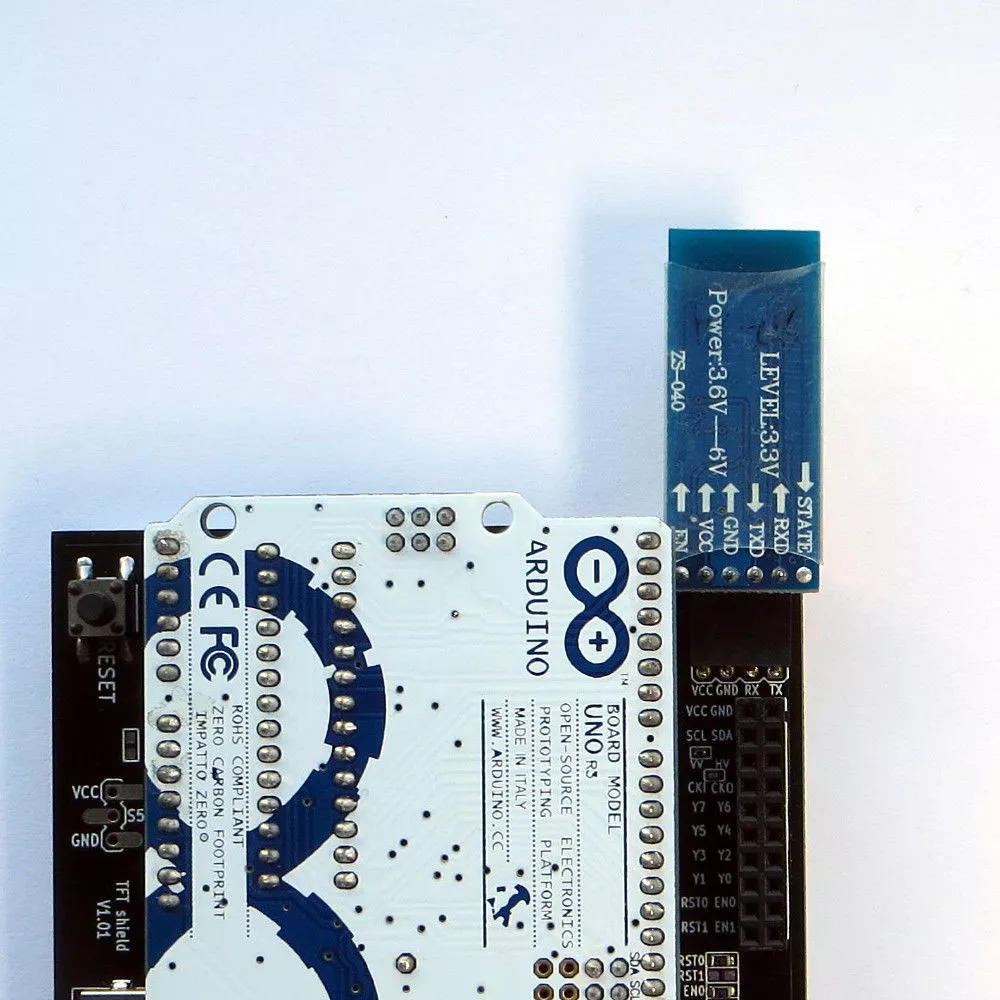
- 4-контактный (2,54 мм) разъем для подключения модуля Bluetooth HC-05 (-06),
- 20-контактный (2,54 мм) разъем для камеры (OV7670).
Программное обеспечение
На данный момент для работы с графикой реализованы следующие библиотечные функции: рисование точек, линий, окружностей, прямоугольников. Самая популярная библиотека от Adafruit Industries была адаптирована для работы со шрифтами. Дополнительно реализована работа с сенсорным экраном и кнопками. Демо эскиз для демонстрации работы с графикой и шрифтами ниже:
#include <YATFT.h> // Hardware-specific library
#include <Adafruit_GFX.h> // Include Adafruit-GFX library
#include <Fonts/FreeSerif9pt7b.h> // Include Adafruit fonts
#include <Fonts/FreeSerifItalic24pt7b.h>
#include <Fonts/FreeSans24pt7b.h>
YATFT tft(0);
uint32_t total_time;
uint16_t Color[4] = {BRIGHTBLUE, BRIGHTGREEN, BRIGHTRED, BRIGHTYELLOW};
uint16_t Gray[7] = {GRAY0, GRAY1, GRAY2, GRAY3, GRAY4, GRAY5, GRAY6};
/*************************************************************************************************/
void ClearScreen (void)
{
tft.SetColor(BLACK); // Set fone color
tft.ClearDevice(); // Fill all screen
}
void setup()
{
Serial.begin(115200); // initialize the serial port
Serial.println("Arduino TFT_shield Example 1!");
tft.begin(); // initialize the display
}
void loop()
{
uint16_t x, y, x2, y2, mask_gray;
uint16_t i;
ClearScreen();
// Fonts
Serial.print("1) View Fonts (");
total_time = millis();
tft.SetColor(BRIGHTBLUE);
tft.SetFont(NULL);
tft.OutTextXY(5, 5, "Demonstration of work with the TFT display.");
tft.SetColor(BRIGHTGREEN);
tft.SetFont(&FreeSerif9pt7b);
tft.OutTextXY(5, 20, "The example uses fonts from Adafruit.");
tft.SetFont(&FreeSerifItalic24pt7b);
tft.SetColor(BRIGHTCYAN);
tft.OutTextXY(5, 45, "3,5''");
tft.SetColor(BRIGHTRED);
tft.OutTextXY(90, 45, "QVGA");
tft.SetColor(BRIGHTMAGENTA);
tft.OutTextXY(230, 45, "disp.");
tft.SetColor(BRIGHTYELLOW);
tft.SetFont(&FreeSans24pt7b);
tft.OutTextXY(5, 100, "A R D U I N O + T F T");
tft.SetFont(NULL);
for (i = 0; i < 7; i++)
{
tft.SetColor(Gray[i]);
tft.OutTextXY(5, 170+10*i, "Demonstration of work with the TFT display.");
}
total_time = millis() - total_time;
Serial.print(total_time);
Serial.println(" ms)");
delay(3000);
ClearScreen();
// Circle
Serial.print("2) Draw circle (");
total_time = millis();
tft.SetColor(BRIGHTRED);
for (i = 10; i < GetMaxY()>>1; i += 10) {
tft.DrawCirc(GetMaxX()>>1, GetMaxY()>>1, i);
}
total_time = millis() - total_time;
Serial.print(total_time);
Serial.println(" ms)");
delay(1000);
// DrawFillCircle & DrawFillRect
Serial.print("3) Draw FillCircle and FillRect (");
total_time = millis();
tft.SetColor(BRIGHTRED);
tft.DrawFillCirc(GetMaxX()>>1,GetMaxY()>>1,110);
tft.SetColor(BRIGHTCYAN);
tft.DrawFillRect(GetMaxX()/2-77,GetMaxY()/2-77, GetMaxX()/2+77,GetMaxY()/2+77);
tft.SetColor(BRIGHTGREEN);
tft.DrawFillCirc(GetMaxX()>>1,GetMaxY()>>1,77);
tft.SetColor(BRIGHTMAGENTA);
tft.DrawFillRect(GetMaxX()/2-54,GetMaxY()/2-54, GetMaxX()/2+54,GetMaxY()/2+54);
tft.SetColor(BRIGHTBLUE);
tft.DrawFillCirc(GetMaxX()>>1,GetMaxY()>>1,54);
tft.SetColor(BRIGHTYELLOW);
tft.DrawFillRect(GetMaxX()/2-37,GetMaxY()/2-37, GetMaxX()/2+37,GetMaxY()/2+37);
total_time = millis() - total_time;
Serial.print(total_time);
Serial.println(" ms)");
delay(1000);
ClearScreen();
// Arc
Serial.print("4) Draw Arc (");
total_time = millis();
ClearScreen();
tft.SetColor(BRIGHTBLUE);
tft.DrawArc((GetMaxX()>>1)-60,(GetMaxY()>>1)-60,(GetMaxX()>>1)+60,(GetMaxY()>>1)+60,20,30,0xFF);
tft.SetColor(BRIGHTGREEN);
tft.DrawArc((GetMaxX()>>1)-40,(GetMaxY()>>1)-40,(GetMaxX()>>1)+40,(GetMaxY()>>1)+40,20,30,0xFF);
tft.SetColor(BRIGHTRED);
tft.DrawArc((GetMaxX()>>1)-20,(GetMaxY()>>1)-20,(GetMaxX()>>1)+20,(GetMaxY()>>1)+20,20,30,0xFF);
total_time = millis() - total_time;
Serial.print(total_time);
Serial.println(" ms)");
delay(1000);
Serial.print("5) Draw FillBevel (");
total_time = millis();
tft.SetColor(BRIGHTBLUE);
tft.DrawFillBevel((GetMaxX()>>1)-60,(GetMaxY()>>1)-60,(GetMaxX()>>1)+60,(GetMaxY()>>1)+60,30);
tft.SetColor(BRIGHTGREEN);
tft.DrawFillBevel((GetMaxX()>>1)-40,(GetMaxY()>>1)-40,(GetMaxX()>>1)+40,(GetMaxY()>>1)+40,30);
tft.SetColor(BRIGHTRED);
tft.DrawFillBevel((GetMaxX()>>1)-20,(GetMaxY()>>1)-20,(GetMaxX()>>1)+20,(GetMaxY()>>1)+20,30);
total_time = millis() - total_time;
Serial.print(total_time);
Serial.println(" ms)");
delay(1000);
ClearScreen();
Serial.print("6) Draw Arc (");
total_time = millis();
for (i = 0; i < 4; i++) {
tft.SetColor(Color[i]);
tft.DrawArc((GetMaxX()>>1),(GetMaxY()>>1)-50,(GetMaxX()>>1),(GetMaxY()>>1)+50,50,60,0x11<<i);
}
for (i = 0; i < 4; i++) {
tft.SetColor(Color[i]);
tft.DrawArc((GetMaxX()>>1),(GetMaxY()>>1)-30,(GetMaxX()>>1),(GetMaxY()>>1)+30,35,45,0x11<<i);
}
for (i = 0; i < 4; i++) {
tft.SetColor(Color[i]);
tft.DrawArc((GetMaxX()>>1),(GetMaxY()>>1),(GetMaxX()>>1),(GetMaxY()>>1),20,30,0x11<<i);
}
total_time = millis() - total_time;
Serial.print(total_time);
Serial.println(" ms)");
delay(1000);
ClearScreen();
// Draw 1000 random lines
Serial.print("7) Draw 1000 random lines (");
total_time = millis();
for (i = 0; i < 1000; i++) {
tft.SetColor(random(65535));
x = random(GetMaxX());
y = random(GetMaxY());
x2 = random(GetMaxX());
y2 = random(GetMaxY());
tft.DrawLine(x, y, x2, y2);
}
total_time = millis() - total_time;
Serial.print(total_time);
Serial.println(" ms)");
delay(1000);
// Draw 1000 random lines
Serial.print("8) ReDraw 10 Fill Screen (");
total_time = millis();
tft.SetColor(BLACK); // Set fone color
tft.ClearDevice(); // Fill all screen
tft.SetColor(BRIGHTBLUE); // Set fone color
tft.ClearDevice(); // Fill all screen
tft.SetColor(YELLOW); // Set fone color
tft.ClearDevice(); // Fill all screen
tft.SetColor(BRIGHTGREEN); // Set fone color
tft.ClearDevice(); // Fill all screen
tft.SetColor(BRIGHTRED); // Set fone color
tft.ClearDevice(); // Fill all screen
tft.SetColor(BRIGHTCYAN); // Set fone color
tft.ClearDevice(); // Fill all screen
tft.SetColor(GREEN); // Set fone color
tft.ClearDevice(); // Fill all screen
tft.SetColor(BRIGHTYELLOW); // Set fone color
tft.ClearDevice(); // Fill all screen
tft.SetColor(BRIGHTCYAN); // Set fone color
tft.ClearDevice(); // Fill all screen
tft.SetColor(BLACK); // Set fone color
tft.ClearDevice(); // Fill all screen
total_time = millis() - total_time;
Serial.print(total_time);
Serial.println(" ms)");
delay(1000);
}
Демо пример, демонстрирующий работу со шрифтами и сенсорным экраном:
#include <YATFT.h> // Hardware-specific library
#include <SPI.h> // Include SPI library
#include <XPT2046_Touchscreen.h> // Include Touchscreen library
#include <Adafruit_GFX.h> // Include Adafruit-GFX library
#include <Fonts/FreeSerif9pt7b.h> // Include Adafruit fonts
#include <Fonts/FreeSerifItalic24pt7b.h>
#include <Fonts/FreeSans24pt7b.h>
// Touchscreen: MOSI=11, MISO=12, SCK=13, CS=2
#define CS_PIN 2
XPT2046_Touchscreen ts(CS_PIN, 255);
YATFT tft(0);
#define Y_BAR_TOP (GetMaxY()-50)
#define Y_BAR_BOT GetMaxY()
#define BUTTON1_MASK 0x01
#define BUTTON2_MASK 0x02
#define BUTTON3_MASK 0x04
#define BUTTON4_MASK 0x08
#define BUTTON5_MASK 0x10
/*
If using the shield, all control and data lines are fixed, and
a simpler declaration can optionally be used:
*/
//uint32_t total_time;
uint16_t pos_x[] = {0,0,0,0};
uint16_t pos_y[] = {0,0,0,0};
uint8_t pos_x_cnt = 0;
uint8_t pos_y_cnt = 0;
uint16_t pos_x_mid = 0;
uint16_t pos_y_mid = 0;
uint16_t color_paint = WHITE;
uint8_t buttons = 0;
uint16_t Color[4] = {BRIGHTBLUE, BRIGHTGREEN, BRIGHTRED, BRIGHTYELLOW};
uint16_t Gray[7] = {GRAY0, GRAY1, GRAY2, GRAY3, GRAY4, GRAY5, GRAY6};
/*************************************************************************************************/
void ClearScreen (void)
{
tft.SetColor(BLACK); // Set fone color
tft.ClearDevice(); // Fill all screen
}
void setup()
{
Serial.begin(115200); // initialize the serial port
Serial.println("Arduino TFT_shield Example1!");
ts.begin(); // Init Touchscreen
SPI.end(); // Disable SPI for correct work DB2 (SS) pin
tft.begin(); // initialize the display
RefreshWindow();
}
void loop()
{
uint16_t x, y;
// Touch
// When the SS pin is set as OUTPUT, it can be used as
// a general purpose output port (it doesn't influence
// SPI operations).
SPI.begin();
if (ts.touched())
{
TS_Point p = ts.getPoint();
Serial.print(F("Pressure = "));
Serial.print(p.z);
Serial.print(F(", x = "));
Serial.print(p.x);
Serial.print(F(", y = "));
Serial.print(p.y);
Serial.println();
delay(3); // Delay for filtering
SPI.end(); // Disable SPI for correct work DB2 (SS) pin
// Calculate coordinates x, y from code ADC
if (p.x < 200) p.x = 200;
if (p.y < 250) p.y = 250;
#if 0
x = (uint16_t)(320L - ((uint32_t)p.x - 200L)*10L/115L);
y = (uint16_t)(((uint32_t)p.y - 250L)/15L);
#else
x = (uint16_t)(0 + ((uint32_t)p.y - 200L)*10L/115L);
y = (uint16_t)(((uint32_t)p.x - 250L)/15L);
#endif
// Filtering
pos_x_mid = (pos_x[0] + pos_x[1] + pos_x[2] + pos_x[3])/4;
pos_y_mid = (pos_y[0] + pos_y[1] + pos_y[2] + pos_y[3])/4;
pos_x[pos_x_cnt++] = x;
pos_y[pos_y_cnt++] = y;
pos_x_cnt &= 0x03;
pos_y_cnt &= 0x03;
if (x > (pos_x_mid - 10) && x < (pos_x_mid + 10) && y > (pos_y_mid - 10) && y < (pos_y_mid + 10 )) {
if (y > Y_BAR_TOP && y < Y_BAR_BOT) {
if (x < 1*(GetMaxX()+1)/5) { // Touch Bar 1
color_paint = Color[0];
RefreshTitle();
} else
if (x < 2*(GetMaxX()+1)/5) { // Touch Bar 2
color_paint = Color[1];
RefreshTitle();
} else
if (x < 3*(GetMaxX()+1)/5) { // Touch Bar 3
color_paint = Color[2];
RefreshTitle();
} else
if (x < 4*(GetMaxX()+1)/5) { // Touch Bar 4
color_paint = Color[3];
RefreshTitle();
} else { // Clear screen
RefreshWindow();
}
} else {
tft.SetColor(color_paint);
tft.DrawFillRect(x-1, y-1, x+1, y+1);
}
}
}
SPI.end(); // Disable SPI for correct work DB2 (SS) pin
ScanKey();
}
void RefreshWindow(void)
{
color_paint = WHITE;
ClearScreen();
for (uint8_t i = 0; i < 4; i++) {
tft.SetColor(Color[i]);
tft.DrawFillRect((i+1)*((GetMaxX()+1)/5), Y_BAR_TOP, (i)*((GetMaxX()+1)/5), Y_BAR_BOT);
}
RefreshTitle();
tft.SetColor(WHITE);
tft.OutTextXY(GetMaxX() - 50, GetMaxY() - 45, "Clear");
tft.OutTextXY(GetMaxX() - 55, GetMaxY() - 25, "screen");
}
void RefreshTitle(void)
{
tft.SetColor(color_paint);
tft.SetFont(&FreeSerif9pt7b);
tft.OutTextXY(3, 20, "Touch color bar and screen or press key.");
}
void ScanKey(void)
{
static uint8_t buttons_last = 0;
buttons = tft.scanButtons();
if (buttons != buttons_last) {
if (buttons & BUTTON1_MASK) { // Bar 1
color_paint = Color[0];
RefreshTitle();
}
if (buttons & BUTTON2_MASK) { // Bar 2
color_paint = Color[1];
RefreshTitle();
}
if (buttons & BUTTON3_MASK) { // Bar 3
color_paint = Color[2];
RefreshTitle();
}
if (buttons & BUTTON4_MASK) { // Bar 4
color_paint = Color[3];
RefreshTitle();
}
if (buttons & BUTTON5_MASK) { // Clear screen
RefreshWindow();
}
}
buttons_last = buttons;
}
Демо-эскиз логической игры «Столбцы» для демонстрации работы с графикой, текстом и кнопками:
#include <YATFT.h>
#include <XPT2046_Touchscreen.h>
#include <Adafruit_GFX.h> // Core graphics library
#include <Fonts/FreeMonoBoldOblique12pt7b.h>
#include <Fonts/FreeSerif9pt7b.h>
YATFT tft(0);
long randNumber;
#define KEY_EMPTY 0
#define KEY_SWAP 1
#define KEY_FALL 2
#define KEY_LEFT 3
#define KEY_RIGHT 4
#define DISPLAY_MAX_X 320
#define DISPLAY_MAX_Y 240
#define MaxCol 8
#define MaxRow 17
#define SmeX 3
#define SmeY 3
#define razmer 15
#define LL 250
#define NumCol 6
#define MaxLevel 8
#define PeriodLevel 80
#define DISP_LEFT ((DISPLAY_MAX_X - MaxCol*razmer)/2 - 2)
#define DISP_RIGHT ((DISPLAY_MAX_X + MaxCol*razmer)/2 + 2)
#define DISP_TOP ((DISPLAY_MAX_Y - (MaxRow-4)*razmer)/2 - 2 - 10)
#define DISP_BOT ((DISPLAY_MAX_Y + (MaxRow-4)*razmer)/2 + 2 - 10)
uint8_t MasSt[MaxCol][MaxRow], MasTmp[MaxCol][MaxRow], MasOld[MaxCol][MaxRow], fignext[3];
uint8_t Level=1, OldLevel, tr, flfirst=1;
uint16_t MasCol[]={WHITE, BLACK, BRIGHTRED, BRIGHTBLUE, BRIGHTGREEN, BRIGHTYELLOW, BRIGHTMAGENTA, BRIGHTCYAN};
unsigned long Counter,Score=0, TScore=0, Record=0, OldRecord, OldScore, myrecord;
uint16_t tempspeed;
bool fl, Demo=true, myfl=false, Arbeiten=false, FlNew, FlZ=false;
int8_t VAL, Mp, x,y;
int8_t mmm [4][2]={{-1,0},{0,-1},{1,0},{0,1}};
uint16_t MasSpeed[MaxLevel]={500,450,400,350,300,250,200,100};
/*********************************************************************/
void setup(void)
{
// initialize the serial port
Serial.begin(115200);
Serial.println("TFT_shield_Game1 example!");
tft.begin(); // initialize the display
randomSeed(analogRead(5));
tft.SetColor(WHITE);
tft.ClearDevice();
tft.SetColor(RED);
tft.SetFont(&FreeSerif9pt7b);
tft.OutTextXY( 20, 20, "LEVEL");
tft.OutTextXY(240, 20, "NEXT");
tft.OutTextXY( 20, 75, "SCORE");
tft.OutTextXY( 25, 130, "TOP");
FlNew = true;
ViewStacan();
GetNext();
delay(100);
tft.SetColor(BLACK);
tft.DrawLine(DISP_LEFT + 1, DISP_TOP + 0, DISP_LEFT + 1, DISP_BOT - 1);
tft.DrawLine(DISP_LEFT + razmer*MaxCol+5-MaxCol,DISP_TOP + 0,DISP_LEFT + razmer*MaxCol+5-MaxCol, DISP_BOT - 1);
tft.DrawLine(DISP_LEFT + 1, DISP_BOT - 1, DISP_LEFT + 1+razmer*MaxCol+5-MaxCol-1, DISP_BOT - 1);
// Key
tft.SetColor(BRIGHTBLUE);
tft.DrawCirc( 32,228, 8); // ROTATE
tft.DrawLine( 88,220, 96,236); tft.DrawLine( 88,220,104,220); tft.DrawLine( 96,236,104,220); // DROP
tft.DrawRect(152,220,157,236); tft.DrawRect(163,220,168,236); // PAUSE
tft.DrawLine(232,220,232,236); tft.DrawLine(232,220,216,228); tft.DrawLine(232,236,216,228); // LEFT
tft.DrawLine(280,220,280,236); tft.DrawLine(280,220,296,228); tft.DrawLine(280,236,296,228); // RIGHT
}
void loop(void)
{
if (Demo) ProcDemo();
else {
if (Arbeiten) {
mydelay(tempspeed);
figmove(0,1);
} else if (mypush()==KEY_SWAP/*ShortPush*/) NewGame();
}
}
uint8_t mypush(void)
{
unsigned long tpr = millis();
uint8_t res = KEY_EMPTY;//NotPush;
uint8_t button = 0;
static uint8_t button_old;
static uint8_t cnt = 0;
button = tft.scanButtons();
if (button) {
cnt = 5;
Serial.print("Scan Button: ");
Serial.print(button, HEX);
Serial.println();
if (button != button_old) {
if (button & 0x01) res = KEY_SWAP;
if (button & 0x02) res = KEY_FALL;
if (button & 0x04) {};
if (button & 0x08) res = KEY_LEFT;
if (button & 0x10) res = KEY_RIGHT;
button_old = button;
}
}
if (!cnt) {
button_old = button;
} else {
cnt--;
}
return(res);
}
void ViewQuad(uint8_t i,uint8_t j,uint8_t mycolor)
{
if (j<3) return;
uint16_t wy = DISP_TOP + SmeY + (j-3)*razmer - j;
uint16_t wx = DISP_LEFT + SmeX + i*razmer - i;
if (mycolor!=0) {
tft.SetColor(BLACK);
tft.DrawRect(wx, wy, wx+razmer-1, wy+razmer-1);
tft.SetColor(MasCol[mycolor]);
tft.DrawFillRect(wx+1, wy+1, wx+1+razmer-3, wy+1+razmer-3);
} else {
tft.SetColor(WHITE);
tft.DrawFillRect(wx+1, wy+0, wx+1+razmer-3, wy+1+razmer-3);
}
}
void ViewStacan(void)
{
char myStr2[5];
uint8_t h = tft.GetTextHeight(&FreeMonoBoldOblique12pt7b);
tft.SetFont(&FreeMonoBoldOblique12pt7b);
if (OldScore!=Score || FlNew) {
sprintf(myStr2,"%05d",Score);
int16_t w = tft.GetTextWidth(myStr2, &FreeMonoBoldOblique12pt7b);
tft.SetColor(WHITE);
tft.DrawFillRect(20,100,20+w+5,100+h);
tft.SetColor(GREEN);
tft.OutTextXY(20,100,myStr2);
OldScore=Score;
}
if (OldRecord!=Record || FlNew) {
sprintf(myStr2,"%05d",Record );
int16_t w = tft.GetTextWidth(myStr2, &FreeMonoBoldOblique12pt7b);
tft.SetColor(WHITE);
tft.DrawFillRect(20,155,20+w+5,155+h);
tft.SetColor(GREEN);
tft.OutTextXY(20,155,myStr2);
OldRecord=Record;
}
if (OldLevel!=Level || FlNew) {
sprintf(myStr2,"%01d",Level );
int16_t w = tft.GetTextWidth(myStr2, &FreeMonoBoldOblique12pt7b);
tft.SetColor(WHITE);
tft.DrawFillRect(25,45,25+w+5,45+h);
tft.SetColor(GREEN);
tft.OutTextXY(25,45,myStr2);
OldLevel=Level;
}
FlNew=false;
for (byte j=3;j<MaxRow;j++)
for (byte i=0;i<MaxCol;i++)
if (MasSt[i][j]!=MasOld[i][j]) ViewQuad(i,j,MasSt[i][j]);
for (byte j=3;j<MaxRow;j++)
for (byte i=0;i<MaxCol;i++)
MasOld[i][j]=MasSt[i][j];
}
void ClearMas(byte MasStx[MaxCol][MaxRow])
{
for (byte j=0;j<MaxRow;j++)
for (byte i=0;i<MaxCol;i++)
(MasStx[i][j]=0);
}
void Sosed (int i,int j,int dx,int dy, byte mode)
{
int nx=i+dx;
int ny=j+dy;
if (nx>=0 && ny>=0 && nx<MaxCol && ny<MaxRow && MasSt[nx][ny]==MasSt[i][j]) {
if (mode==1) MasTmp[i][j]++;
else
if (mode==2 && (MasTmp[nx][ny]>1 || MasTmp[i][j]>2 )) {
MasTmp[nx][ny]=3;
MasTmp[i][j]=3;
} else
if (mode==3 && MasTmp[nx][ny]==3) {
if (MasTmp[i][j]!=3) {
MasTmp[i][j]=3;
fl=true;
}
}
}
}
void Sos(int i,int j, byte mode)
{
for (byte k=0;k<4;k++) Sosed(i,j,mmm[k][0],mmm[k][1],mode);
}
bool FindFull(void)
{
byte i,j,k; bool res;
res = false;
for (byte k=2;k<8;k++) {
ClearMas(MasTmp);
for (j=3;j<MaxRow;j++)
for (i=0;i<MaxCol;i++)
if (MasSt[i][j]==k) Sos(i,j,1);
for (j=3;j<MaxRow;j++)
for (i=0;i<MaxCol;i++)
if (MasTmp[i][j]>1) Sos(i,j,2);
do {
fl=false;
for (j=3;j<MaxRow;j++)
for (i=0;i<MaxCol;i++)
if (MasTmp[i][j]>0) Sos(i,j,3);
} while (fl);
for (j=3;j<MaxRow;j++)
for (i=0;i<MaxCol;i++)
if (MasTmp[i][j]==3) {
MasSt[i][j]=1;
TScore++;
}
}
if (TScore>0) {
ViewStacan();
FlZ=true;
mydelay(500);
}
for (j=0;j<MaxRow;j++)
for (i=0;i<MaxCol;i++) {
while (MasSt[i][MaxRow-1-j]==1) {
for (k=0;k<MaxRow-2-j;k++) MasSt[i][MaxRow-1-k-j]= MasSt[i][MaxRow-2-k-j];
res=true;
}
}
return(res);
}
void GetNext(void)
{
byte dx=255;
byte dy=60;
x=3;
y=0;
for (byte i=0;i<3;i++) {
//fig[i]=fignext[i];
if (!Demo) MasSt[x][i]=fignext[i];
fignext[i]=random(NumCol)+2;
tft.SetColor(BLACK);
tft.DrawRect(dx,dy+(razmer-1)*i,dx+razmer, dy+(razmer-1)*(i+1)+1);
tft.SetColor(MasCol[fignext[i]]);
tft.DrawFillRect(dx+1,dy+(razmer-1)*i+1, dx+razmer-1, dy+(razmer-1)*(i+1));
}
if (!Demo) {
Counter++;
if (Counter==PeriodLevel) {
Counter=0;
Level++;
if (Level>MaxLevel) Level=MaxLevel;
}
tempspeed=MasSpeed[Level-1];
}
}
void MyScore(void)
{
TScore=0;
while(FindFull()) {
if (TScore>7) Score=Score+TScore+(TScore-8)*2;
else Score=Score+TScore;
ViewStacan();
FlZ=true;
mydelay(1000);
}
FlZ=false;
}
void ProcDemo(void)
{
Score=0;
GetNext();
for (byte j=3;j<MaxRow;j++)
for (byte i=0;i<MaxCol;i++)
MasSt[i][j]=random(6)+2;
ViewStacan();
mydelay(1000);
if (!Demo) return;
MyScore();
if (Record<Score) Record=Score;
}
void mydelay(int md)
{
unsigned long starttime=millis();
while (millis()-starttime < md) {
VAL=0;
Mp=mypush();
if (Mp==KEY_RIGHT) {
VAL=1;
} else
if (Mp==KEY_LEFT) {
VAL=-1;
}
if ((VAL!=0 || Mp!=KEY_EMPTY/*NotPush*/) && Demo) {
Demo=false;
NewGame();
}
if (VAL!=0 && figmove(VAL, 0) && !FlZ) {
for (byte i=0;i<3;i++) {
MasSt[x+VAL][y+i]=MasSt[x][y+i];
MasSt[x][y+i]=0;
}
ViewStacan();
if (MasSt[x][y+3]==0) {
tft.SetColor(WHITE);
tft.DrawLine(DISP_LEFT+SmeX+x*(razmer-1)+1, DISP_TOP+SmeY+y*(razmer-1)-3, DISP_LEFT+SmeX+(x+1)*(razmer-1)-1, DISP_TOP+SmeY+y*(razmer-1)-3);
}
x=x+VAL;
}
if (Mp==KEY_SWAP/*ShortPush*/ && !FlZ) {
byte aa=MasSt[x][y];
MasSt[x][y]=MasSt[x][y+2];
MasSt[x][y+2]=MasSt[x][y+1];
MasSt[x][y+1]=aa;
ViewStacan();
}
if (Mp==KEY_FALL && !FlZ) tempspeed=50;
}
}
void NewGame(void)
{
for (byte i=0; i<(MaxCol+1); i++) {
tft.SetColor(BLACK);
tft.DrawLine(DISP_LEFT+3+(razmer-1)*i, DISP_TOP, DISP_LEFT+3+(razmer-1)*i, DISP_BOT-3);
}
for (byte j=3;j<MaxRow;j++)
for (byte i=0;i<MaxCol;i++)
MasOld[i][j]=255;
Score=0;
FlNew=true;
OldScore=Score;
ClearMas(MasSt);
Arbeiten=true;
GetNext();
Counter=0;
Level=1;
tempspeed=MasSpeed[0];
Record=myrecord;
ViewStacan();
}
void gameover(void)
{
Arbeiten=false;
tft.SetColor(BLACK);
tft.DrawRect(112,90,202,145);
tft.SetColor(RED);
tft.DrawFillRect(113,91,201,144);
tft.SetFont(&FreeSerif9pt7b);
tft.SetColor(WHITE);
tft.OutTextXY(132, 100, "GAME");
tft.OutTextXY(135, 120, "OVER");
}
bool figmove(int dx, int dy)
{
bool fff=false;
if (x+dx<0 || x+dx>MaxCol-1) return(false);
if (dx!=0) if (MasSt[x+dx][y+dy+2]==0) return(true); else return(false);
if (dy>0) {
if (y+dy+2>MaxRow-1 || MasSt[x+dx][y+dy+2]>0) {
if (y<3) gameover();
else fff=true;
} else {
for (byte i=0;i<3;i++) MasSt[x][y+2-i+dy]=MasSt[x][y+2-i];
MasSt[x][y]=0;
y=y+dy;
}
if (fff) {
MyScore();
GetNext();
}
ViewStacan();
}
return(true);
}
Демонстрация
Ниже добавлено видео, демонстрирующее работу эскизов.
Купить такой шилд можно на сайте tindie.com.
Шаг 2. Комплектующие

Из оборудования нам понадобятся следующие комплектующие:
- Arduino UNO;
- Уникальный TFT-шилд (ссылка выше);
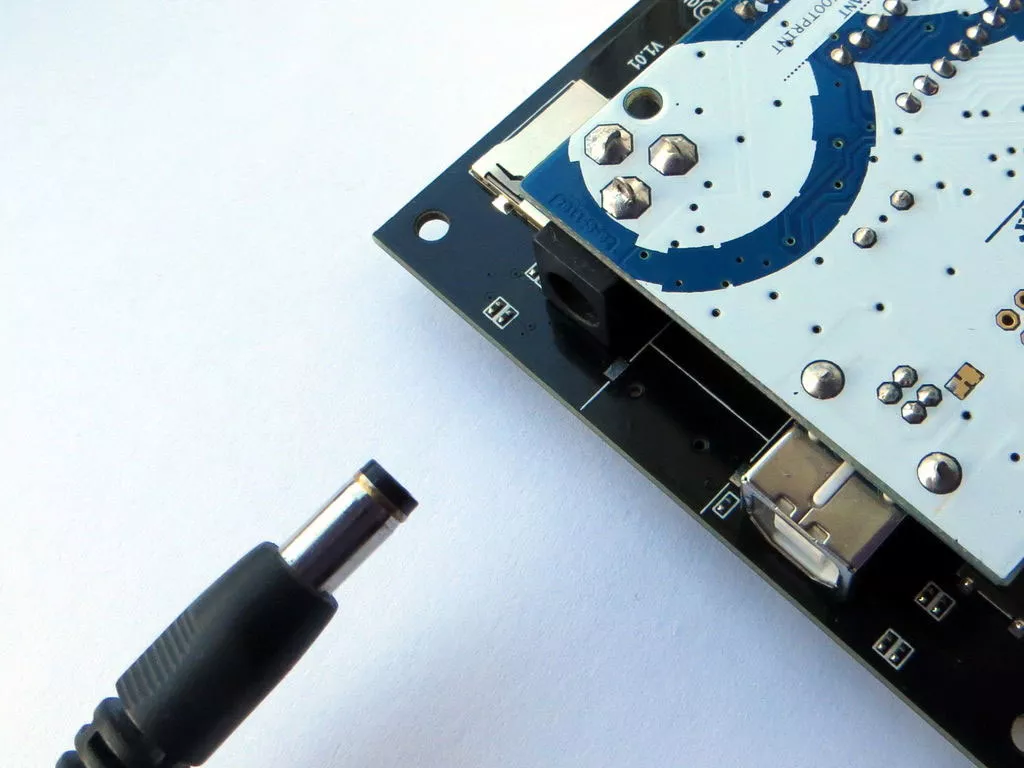
- AC-DC адаптер питания 6-12 вольт, >600 мА;
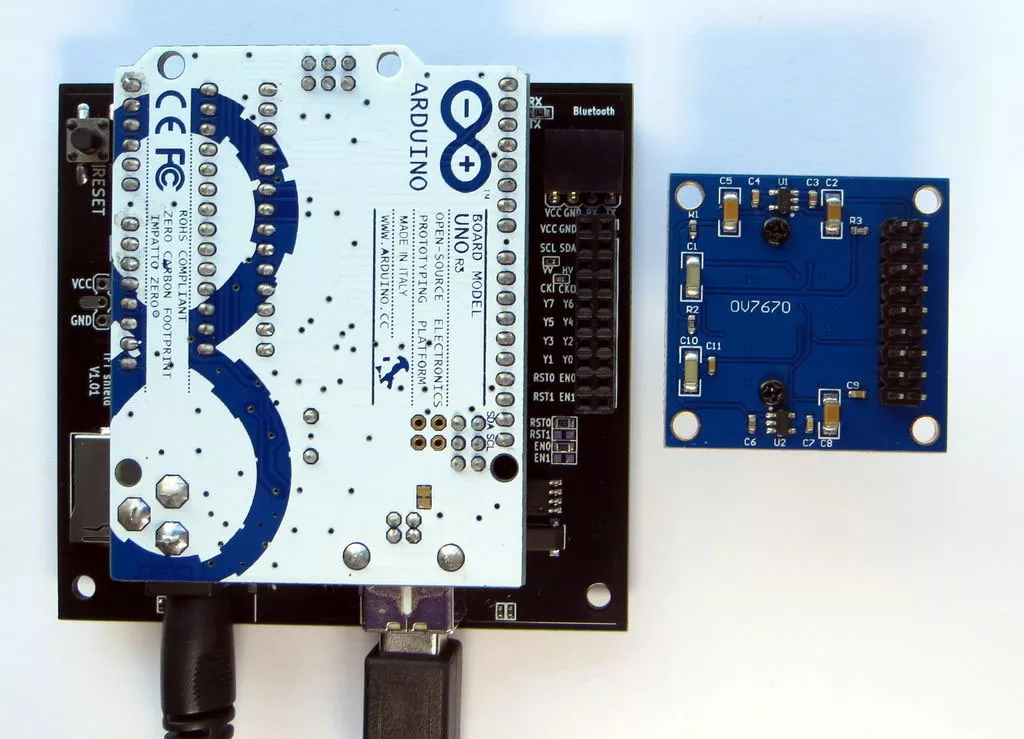
- Камера OV7670;
- Модуль Bluetooth HC-06 (HC-05);
- Телефон на Андроиде.
Программное обеспечение (можно скачать ниже):
- Arduino IDE;
- Библиотека для TFT-экрана;
- APK-файл для телефона Android.
Шаг 3. Подготовка
Программное обеспечение
Все демо скетчи написаны в среде Arduino IDE, поэтому вначале необходимо установить саму Arduino ID, которую можно скачать у на в Инструментарии либо на сайте официального производителя Ардуино.
Затем вам нужно установить библиотеку для TFT отсюда, скачать библиотеку и распаковать ее в папку «библиотеки» в директории Arduino IDE. После установки Arduino IDE необходимо запрограммировать плату Arduino Uno. Для простоты рекомендуем прошивать отдельно, без экрана TFT, а для этого:
- Подключите USB-кабель к плате Arduino UNO;
- Запустите Arduino IDE на компьютере;
- Выберите соответствующий порт, к которому подключен Arduino UNO;
- Загрузите демонстрационный эскиз Arduino_Bluetooth_Camera.ino (и файл ov7670_regs.h для инициализации камеры);
- Нажмите кнопку Загрузить.
Если плата Arduino UNO успешно запрограммирована, вы можете перейти к следующему шагу. Все необходимые библиотеки и файлы вы найдете ниже в zip-архиве.
Android
На телефоне Android необходимо установить Arduino_TFT.apk. Разрешить приложению использовать Bluetooth и камеру.
Модуль Bluetooth
Необходимо установить скорость обмена в модуле Bluetooth равным 115200 (команда «AT + UART = 115200,0,0»). Это оптимальная скорость, с которой Arduino UNO удается получать и обрабатывать данные. Теоретически вы можете увеличить скорость, оптимизировать прием и обработку данных, но для этого требуется больший объем оперативной памяти. Более подробно о том, как установить скорость обмена мы поговорим в ближайших уроках.
Обратите внимание, что модуль Bluetooth подключается к порту отладки Arduino UNO. Таким образом, при работе с Bluetooth порт отладки недоступен. А перед программированием Arduino UNO (в комплекте с модулем Bluetooth) необходимо отключить модуль Bluetooth. И после программирования установить его обратно (!).
Шаг 4. Сборка
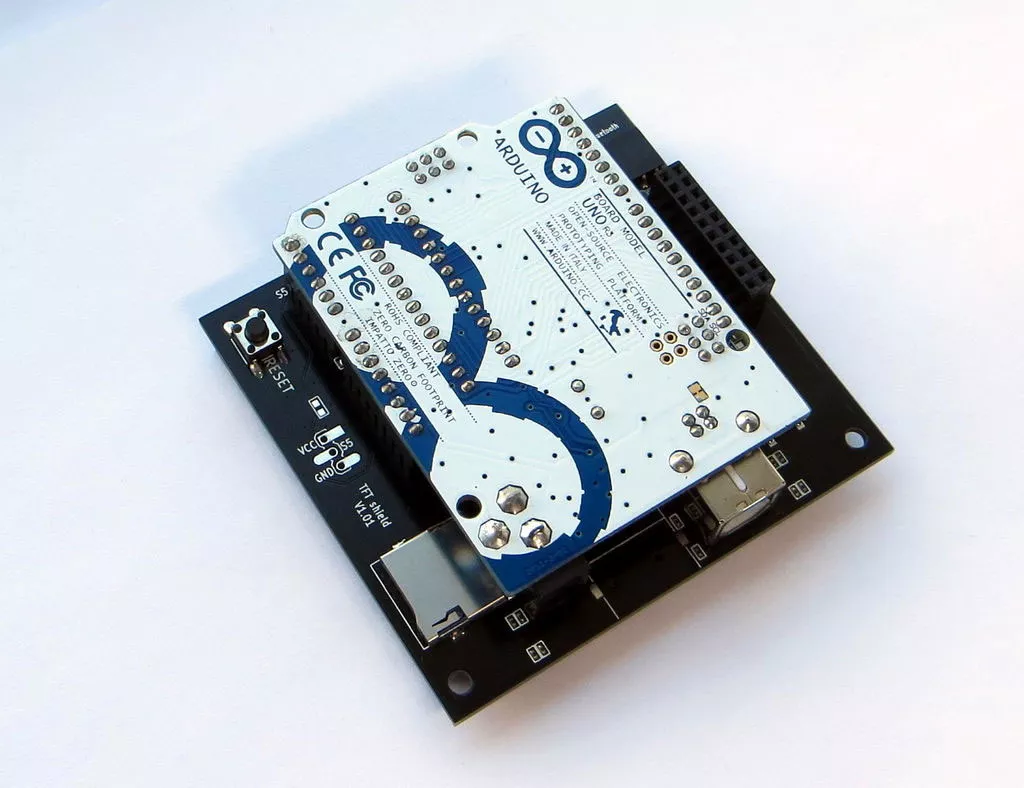


Сборка устройства довольно проста:
- Соедините вместе Arduino UNO и TFT-щит;
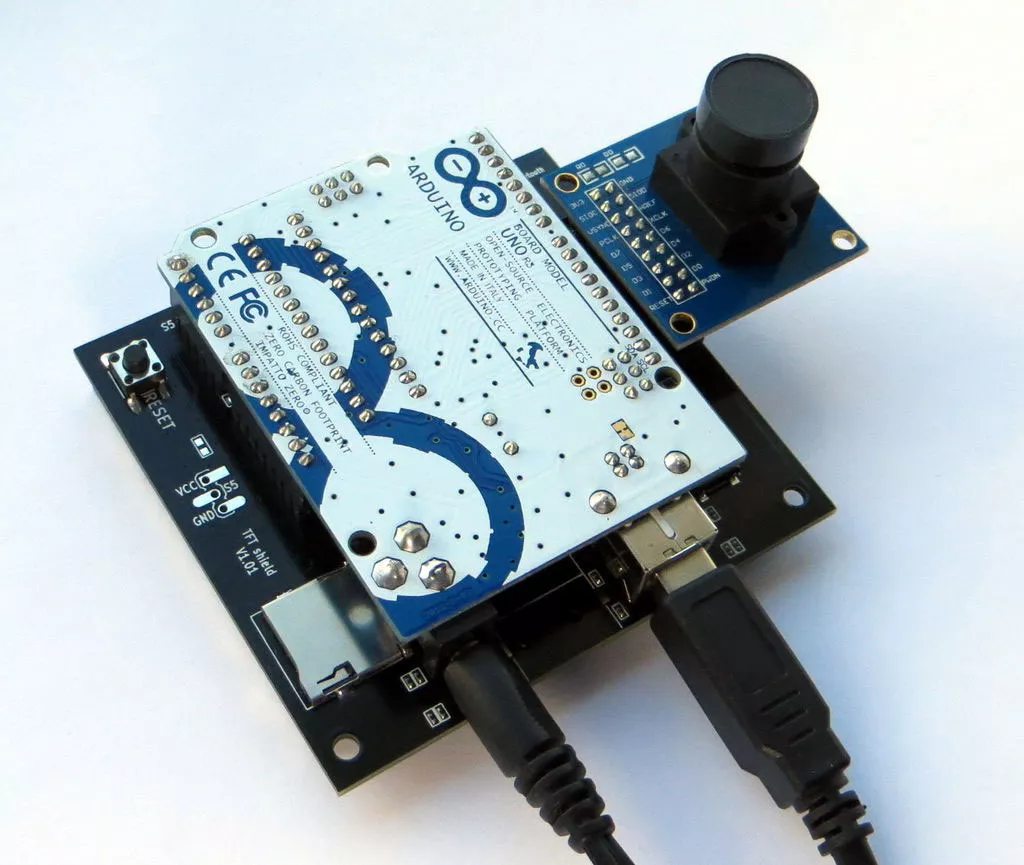
- Подключите камеру OV7670 к 20-контактному разъему на TFT-экране (иногда можно использовать угловой 18-20-контактный разъем с шагом 2,54 мм в качестве адаптера);
- Подключите модуль Bluetooth HC-06 (HC-05) к 4-контактному разъему «Bluetooth» на TFT-экране;
- Подключите адаптер питания 6-12 В ко входу питания на плате Arduino UNO.
После включения питания TFT-экран должен стать красным. Это означает готовность получать команды с телефона Android.
Шаг 5. Демонстрация
Выполните следующие операции на телефоне Android:
- Запустите приложение ArduinoTFT на телефоне Android;
- Поверните телефон в горизонтальное положение;
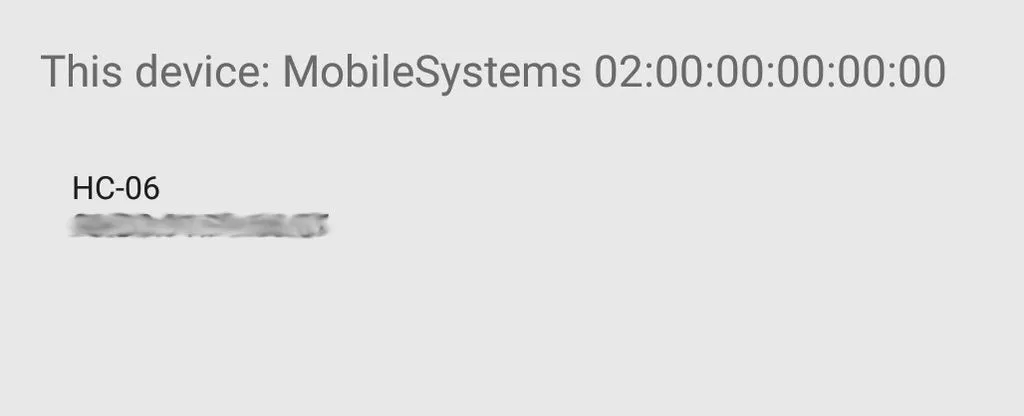
- Включите соединение Bluetooth, выберите обнаруженный модуль Bluetooth (HC-06);
На экране должны появиться два окна и четыре кнопки:
- В верхнем правом окне находится окно видоискателя камеры телефона;
- Большое левое окно - полученные или отправленные изображения.
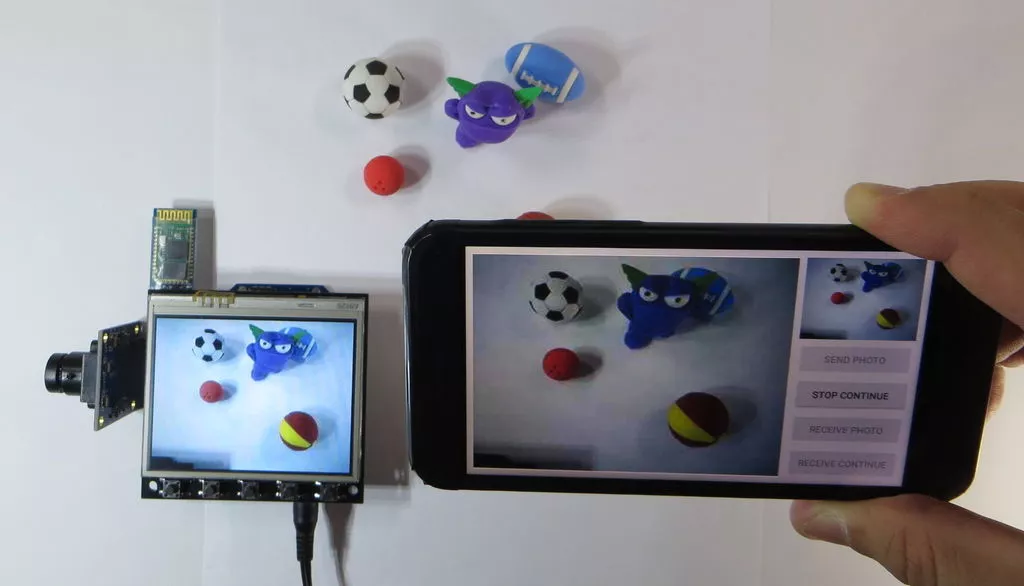


Функции кнопок:
- Передача одного изображения с телефона Android на Arduino;
- Непрерывная передача изображений с телефона Android на Arduino;
- Передача одного изображения из Arduino на телефон Android;
- Непрерывная передача изображений с Arduino на телефон Android.
Размер изображения составляет 320x240 пикселей (2-5 кБ). Выше есть демо-видео.